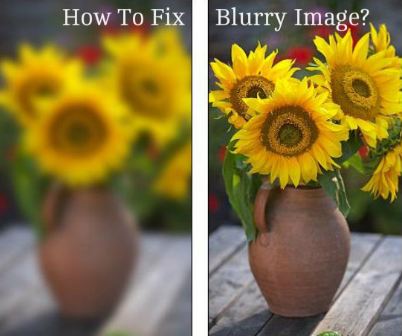
Taking photos has become an inextricable a part of our daily lives. Whether you’re capturing daily moments of your life, taking photos for the gram, or running any business, photography’s everywhere. But, sometimes, a flash is just too fleeting to require an ideal picture. We all find yourself with blurred images on our phones. And more often than not, retaking it’s not an option. Whether the instant has already gone otherwise you checked the photo too late, it’s no excuse. The photo is already ruined. Or is it? So, lets get an answer to this problem as we look into how to unblur an image.
How to Unblur An Image
Obviously you can let just a small camera shake ruin a great and important photo. There will be ways to sharpen or fix that blurry photo of yours and again make it useful rather than it becoming unworthy of storing on your device. There are various apps, paid and free, allowing you to unblur a picture in just few clicks.
Note: Before you unblur a picture , it’s advisable to form a replica. If the editing goes wrong, a minimum of you won’t find yourself with a picture worse than the first .
Using Photoshop for Blurred Images
Adobe Photoshop users can unblur a picture employing a sort of options. The simplest and quickest option is using the ‘Unsharp Mask Filter’.
- Open the image you would like to unblur and attend the panel on the proper .
- Under the choice for ‘Layers’, select the layer.
- Then, attend ‘Filters’ and choose ‘Convert to Smart Object’ from the menu.
- Transitioning to Layers provides you with the option to edit and fix a picture without completely altering it permanently.
- This way, if you don’t just like the results, you’ll always return to the first.
- Now, visit the Filter option > Sharpen.
- Then select ‘Unsharp Mask’ from the sub-menu that follows.
- A panel for ‘Unsharp Mask’ will open.
- Adjust the sliders to the values where you’re satisfied with the result.
- Preview the image before applying the changes. Then, click ‘OK’.
What is the Shake Reduction Filter
Photoshop also features a Shake Reduction filter that focuses on unblurring shaky images. It is advisable to use this tool if any blurriness is caused to movement. It can minimize blur resulting from various sorts of motions, including linear, arc-shaped, rotational, or zigzag. But the simplest thing about it’s that Photoshop automatically analyzes the shaky regions of the image and determines the character of the blur. It then extrapolates the corrections to the whole image.
- Open the Filter menu, attend the ‘Sharpen’ option and choose ‘Shake Reduction’ from the sub-menu.
- The Shake Reduction panel will open within the right panel, and therefore the corrected image will appear there.
- When you feel happy about the automated corrections. Just click on “OK”.
- Or, adjust the sliders to form changes yourself then click OK.
Thus, one can use functionalities like “Unsharp Mask”, “Shake reduction Filter”. One may also use other techniques like Smart Sharpen or High Pass Filter to realize finer details within the final image. These methods require a particular familiarity with the software.
But Photoshop is paid and sophisticated . If you’re not conversant in the software, it’d not be the simplest course of action for you. There are alternatives for the task at hand, with GIMP being one among the simplest of the lot.
Use GIMP to Unblur a picture
GIMP is free, open-source software that gives professional capabilities for image editing. attend gimp.org/downloads and download and install the software on your system.
- Open the image you would like to unblur.
- Then, attend the panel on the left of the screen, and choose the ‘Blur/ Sharpen’ tool.
- If you can’t find the tool directly , it’d be tucked away with the Smudge tool.
- Go to the ‘Smudge’ tool and right-click thereon .
- Then, select ‘Blur/Sharpen’ from the menu.
- The Blur/ Sharpen tool will activate, and therefore the options for it’ll appear on rock bottom half the panel on the left.
- Scroll down on the panel until you reach the choice ‘Convolve Type’.
- Then, select the ‘Sharpen’ option.
- Also, select the speed at which you would like to sharpen.
- Now, drag your cursor over the image or the parts of the image you would like to sharpen.
- One may increase/ decrease the dimensions of the cursor to sharpen certain parts of the image clearly.
How to Unblur an Image Using Paint.net
Paint.net is another free image editing tool which will achieve tons at no cost. Sharpening isn’t one among its strong suits, so if you’re trying to find a free tool, Gimp could also be a far better option. Still, Paint.net does a reputable job of reducing blur in images.
- Open the image in Paint.net.
- Select Effects, Picture, and Sharpen.
- Move the slider within the Sharpen popup to A level you’re proud of .
- Select OK and save.
- The Sharpen tool may introduce noise to the image.
- This maybe reduced by using Effects and Noise Reduction.
Here’s a guide on the VSCO Account
Using Snapseed to Unblur a photo
Snapseed is a Google App. It works both on Android and iPhone. It’s a full image editor that works on most newer devices and features a very full feature set. It performs exquisitely while sharpening a picture.
- Open your image in Snapseed.
- Select the small print menu option.
- Go to the Structure/Sharpen option.
- Next, perform Unblur or go into more details of the image.
- After unblurring and fixing the other errors.
- Save your picture for future use.
Both Sharpen and Structure combine to form tons of difference to a blurry image. I tend to use Sharpen first to get rid of the maximum amount blur as possible then use Structure to bring back the detail.
This will take a touch trial and error until you get the amount just to your liking, but once you are doing your image should be crystal clear and prepared to travel.
How to Unblur an Image on your iPhone
If you’re an iPhone user, and the captured photo is merely slightly blurry and already on your iPhone, one may unblur it using your phone’s inherent editing capabilities.
- Open and select the picture you want to unblur.
- Then click on Edit.
- Then reach out to the option detailing “Sharpness”.
- Once Sharpness is chosen , swipe right the size below and keep swiping until the image is unblurred.
- Then, tap ‘Done’ to save lots of the changes.
When unblurring a picture , it’s important to not go overboard with the sharpening. If you overdo the sharpening, the resulting image won’t look any good or anything just like the original. So, take some time to urge the parameters right, albeit it takes a couple of tries.
It’s also important to recollect that this sort of unblurring works just for images that were blurred during capturing them. If a picture was blurred using editing software, you can’t unblur it, a minimum of without knowledge of the algorithm wont to originally blur the image.
CLOSING
In this tutorial we discussed various methods and apps which can be utilized to unblur or sharpen any image/photo which might have become blur. Or may have been tampered with. But, apart from the apps and methods mentioned here. One can also utilize online tools to perform the action of unblurring an image. Some of the great online tools are Fotor and Photo Sharpen which also do exceedingly well in fixing a blurry image.