In this post, I will take you through the topic, how to fix DISM source files could not be found on Windows. Sometimes, it may be that you will come across this issue though, once in a while. There, you begin to wonder, what to do, in order to resolve the issue. You think all this but to no avail. But, keep calm and rest assured as I am here to help your resolve this issue, once and for all. So, let’s get going together right away in this adventurous journey that I am about to start just now. 🙂
What is DISM?
DISM or “Deployment Image Servicing and Management” is a command line tool that helps prepare the Windows Preinstallation Environment, manages Windows images, and can also be used to repair Windows. It is often used in situations where the System File Checker tool cannot replace damaged system files.
But, it often happens that the DISM command fails due to various reasons. On that note, let’s see a few reasons:
- The DISM tool is unable to locate the files like Windows Update/WSUS that are needed to perform repair.
- The repair source ( install.wim/install.esd) contains multiple install.wim files.
- The repair source (Windows. ISO file) is incorrect or damaged.
Some common codes for errors are:
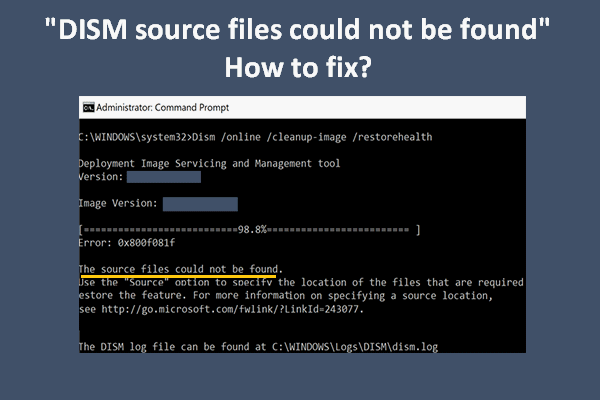
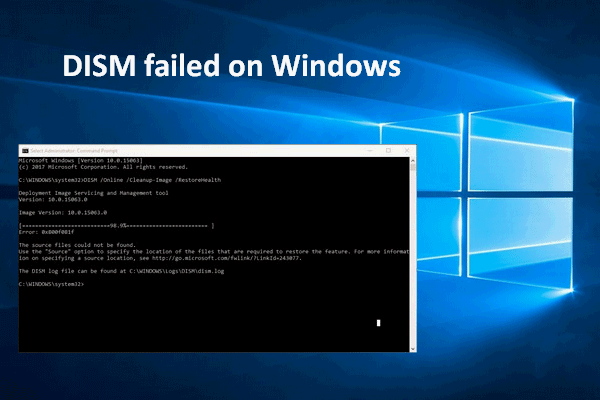
- 0x800f081f
- 0x800f0906
- 0x800f0907
Now, that you know about the various reasons for this issue, let’s take a look at ways to resolve it.

How to Install NodeJS and NPM on Windows and Mac? Check this to find out!! –>
How to fix DISM source files could not be found on Windows 10, 8 or 7?
As you are here to find a fix, let’s start with the first fix right away!
Run the DISM Cleanup command
You can run the DISM Cleanup command your issue. On running this command, corrupted files are searched for and, if found, they are repaired. So, let’s now see the steps that you need to follow for this method:
- Open Command Prompt or Press Windows + R keys together and search for “cmd”.
- Thereafter, right click on it and tap on “Run as Administrator”.
- Next, in the command prompt window that opens, type in the following commands and press the “Enter” key.
$ DISM /Online /Cleanup-Image /StartComponentCleanup sfc /scannow
$ DISM /Online /Cleanup-Image /AnalyzeComponentStore sfc /scannow

# After the above commands, add another one as below:
$ Dism /Online /Cleanup-Image /RestoreHealth
- Hopefully, this resolves your issue and you can sit back and relax now 🙂
Here’s a quality guide on how to resolve the IP Service error!! –>
Clean and Analyze the WinSXS folder
The WinSXS folder is a system folder that contains various versions of files. This folder is used for both updating and installing Windows on your PC. If you clean up this folder by removing unnecessary files, the DISM error can be resolved. So, here’s what you need to do:
- Press the “Windows + R” keys together or Go to Start –> Run
- Thereafter, type in “cmd” to open Command Prompt (start it in Admin mode).
- Thereafter, run the below commands, one by one:
$ DISM /Online /Cleanup-Image /StartComponentCleanup sfc /scannow
$ DISM /Online /Cleanup-Image /AnalyzeComponentMemory sfc /scannow
$ DISM /Online /Cleanup-Image /RestoreHealth
- That’s it! Hopefully, your issue will resolve now 🙂
Want to get Admin privileges on Windows 10? Here’s what you need to do!! –>
Set and alternative Repair Source —- Via the Registry
Now, if you are continuously getting the “DISM source files could not be found” on your Windows system and have tried the above method, but that too didn’t work out. You can then, try setting an alternate repair source. Here’s what you need to do:
Windows 10 or Windows 8 or Windows 7 Users :-
- Press the “Windows + R” keys together or Go to Start –> Run
- Thereafter, type “regedit” and tap on “OK” to open “Windows Registry Editor”.
- Thereafter, you now need to go to HKEY_LOCAL_ MACHINE and then, right-click “Policies“.
- Next, tap on “New” –> “Key” and name this as “Maintenance” and press the Enter button.
- After that, you need to right-click on “Servicing” and tap “New” –> “Expandable String Value” (name it as LocalSourcePath).
- Now, proceed to change the value of this key to “wim:C:\install.wim:1” –> “OK”.
- Similarly, right-click the “Maintenance” key and tap on “New” —> DWORD (32-bit) Value.
- Thereafter, name this key as “UseWindowsUpdate“.
- Again, change its value to “2” and tap on “OK”.
- Finally, restart your PC and hopefully your issue resolves for the better.
Windows 10 and Windows Enterprise Edition :-
- Press the “Windows + R” keys together or Go to Start –> Run
- Thereafter, type “gpedit.msc” and tap on “OK” to open “Group Policy Editor”.
- Thereafter, tap on “Computer Configuration” and select “Administrative Templates”.
- Next, click on “System” (right pane) and double-click “Set Settings” for option “Component Installation and Component Repair”.
- Now, proceed to select “Enabled” and type “wim:C:\install.wim:1” under the “Alternate source file path” option.
- Thereafter, enable the “Never attempt to download payloads from Windows Update” option and tap “Apply” —> “OK”.
- Finally, restart your system.
- Now, you can enter the below command and hopefully your issue will fix.
$ DISM /Online /Cleanup-Image /RestoreHealth
Here’s a quality comparative study on Unit Testing vs Functional Testing!! –>
Resolve the issue by specifying the correct DISM Source
Sometimes the DISM command fails because the tool searches online for the files to repair instead of performing a local search. So, here’s what you need to do:
- First and foremost, you need to Download the Windows 10 ISO file.
Note: This method is only applicable for Windows 10 Users.
- Thereafter, run DISM Restore Health, all you need to do is:
- Navigate to File Explorer and open the downloaded file ISO.
- Next, right-click on that file and select “Mount”
- Next, open “This PC” and tap on the newly mounted DVD drive.
- Then, go to the source folder and copy its path to the “install.esd” or the “install.wim” file.
- Finally, run the below command:
$ DISM /Online /Cleanup-Image /RestoreHealth /Source:"[install.esd/install.wim] file's path"
- Now, you can try starting the DISM source files and hopefully, you will be able to open them this time 🙂
Resolve the issue by fixing the underlying cause of the error
The first and foremost approach that you should employ is fixing the underlying root cause of this error. This will help eliminate the error, once and for all. But, remember, you need to keep a backup of your “Registry” beforehand. Now, that you are ready, let’s start with the next steps:
- Navigate to the folder “C:\Windows\Log\CBS“.
- Thereafter, right-click on the CBS.log file and select “Edit in Notepad”.
- Now, when that opens, search for “Checking System Update Readiness“.
- Herein, you need to locate the corrupt package (the reason for this DISM issue) and copy it to the line that contains “Checking System Update Readiness”.
- Thereafter, press “Windows + R” keys together and type in “regedit” and press Enter.
- Herein, go to the “HKEY_ LOCAL _MACHINE\ SOFTWARE \Microsoft\Windows\CurrentVersion\Component Based Servicing” and select the “Component Based Servicing” key and press “Ctrl + F”.
- Now, proceed to paste the corrupted package from above and tap on “Search Next”.
- Thereafter, right-click all the registry keys and select “Export to Backup“.
- After the above step is complete, right-click the set keys and select “Permission” –> “Administrators” —> “Full Access” –> “Apply” –> “OK”
- Finally, restart your system and run the proceeding command:
$ DISM /Online /Cleanup-Image /RestoreHealth
- Hopefully, your DISM source files not found issue resolves now. Enjoy 🙂
Error 97 SMS Origination Denied? Here’s what you have to do!! –>
WRAPPING UP!! –>
By now, I can safely, vouch that you have definitely got your answers on how to fix DISM source files could not be found on Windows? Not only that, you have also come to know about the various reasons for this issue cropping and a multitude of fixes available at your fingertips. With that, do remember, if you’ve any confusion or questions thus whatsoever about this topic, you can always reach out to me in the comments section and I will readily try to help. On that note, until the next time, see ya!! Goodbye!!