Sharding is a method of distributing or partitioning data across multiple machines. It is useful when a single machine is unable to handle large modern workloads because it allows you to scale horizontally. Horizontal scaling, also known as scale-out, adds more computers to share the data set and load. Horizontal scaling allows for virtually unlimited scaling to handle large data sets and intense workloads. Now, that you have got some knowledge about sharding let us see in MongoDB when to shard. Before this, we will see the basic sharding architecture. So, let’s begin right away.
Don’t know how MongoDB index works? Worry not, click here to find out !! ~~>
MongoDB When to Shard
In this section, we will first see the basic sharding architecture before proceeding to other branches of this topic.
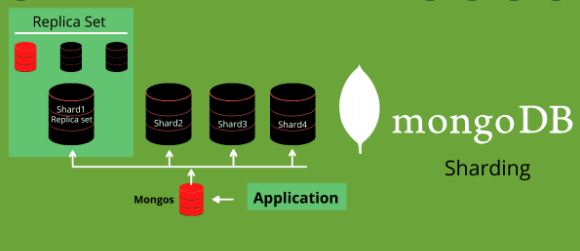
Sharding Architecture
In MongoDB, a sharding cluster consists of:
- Shards
- Mongos
- Config servers
So, we can say that a shard is like a replica set containing a subset of the main cluster’s data.
While the Mongos acts as a query router for client applications, processing both reads and writes. It forwards client requests to the appropriate shards and combines the results of the shards into a unified client response. Clients connect to Mongos, not to individual shards.
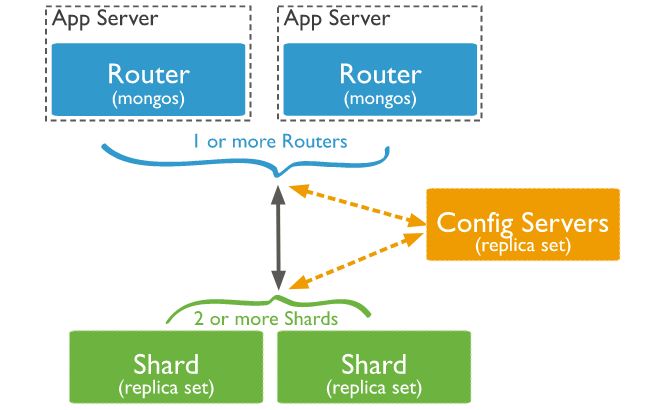
And what about the config servers then? These are the authoritative sources of metadata of sharding. Sharding metadata reflects the state and organization of sharding data. The metadata includes the list of split collections, routing information, etc.
Here’s how to use MongoDB with Python !! ~~> ~~>
Pros of Sharding
With sharding, you can scale your database almost indefinitely to handle higher loads. This is done by increasing read/write throughput, storage capacity, and high availability. Now, let us see each advantage one by one:
- Greater r/w throughput: Sharding gives you the ability to distribute dataset across numerous shards.
- Larger storage capacity: Increasing the number of shards, also increases the total storage capacity.
- Greater availability: Since the data is distributed, the database as a whole remains partially functional even if one shard becomes unavailable and is read and written by the remaining shards.
- Data localization: With zone sharding, you can easily create distributed databases to support geographically dispersed applications, with policies enforcing data availability within specific regions. Each zone can have one or more shards.
Now, that we have become aware of the various advantages of sharding. Let us now look at how is data distributed.
Use Grouping in MongoDB — Here’s how to !! ~~> ~~>
Data Distribution — MongoDB Shard
The Shard Key
MongoDB shards at the collection level. You select which collection(s) you want to shard. MongoDB uses the shard key to distribute the documents in a collection to shards. Thereafter, it splits data into part/chunk using the division of shard values into ranges. Next, MongoDB attempts to distribute these ” chunks” evenly across the shards in the cluster.
Shard keys are based on fields in each document. The values in these fields decide which shard the document is in, depending on the shard ranges and the set of chunks. This data is stored and kept in the configuration server replica set.
The shard key has a direct impact on the performance of the cluster and should therefore be chosen carefully. A suboptimal shard key can lead to performance or scaling issues due to the uneven distribution of chunks. You can change your data distribution strategy at any time by changing the shard key. Use the following documentation to select the shard key that is best for you.
A background process called a “balancer” automatically migrates chunks between shards to ensure that each shard always has the same number of chunks.
Want to know the MongoDB version that you have ? ~~> ~~>
Typical Sharding Strategy
MongoDB supports two sharding strategies for distributing data across sharding clusters:
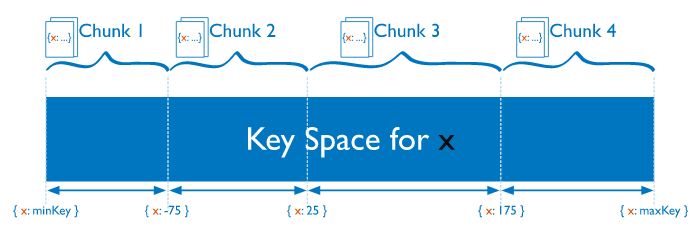
- Ranged Sharding
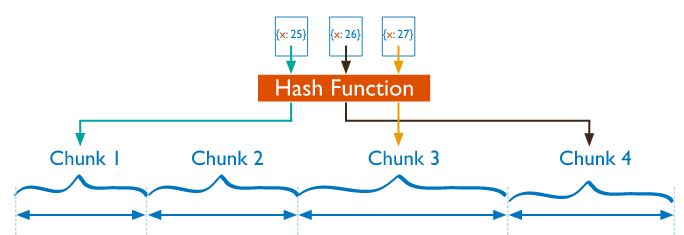
- Hashed Sharding
The Ranged sharding divides data into ranges based on the values of the shard key thereby, giving each part/chunk a value based on the shard key. A range of shard keys whose values are “close together” are more likely to be in the same chunk. This allows for targeted operations since a mongo can forward operations only to the shards that contain the required data.
While, Hashed sharding computes a hash of the value of the shard key field where every part is given a range value based on the values of the hashed shard key. Although a range of shard keys may be “close” to each other, it is unlikely that their hash values will be in the same chunk.
Data distribution based on hash values facilitates more uniform data distribution, especially in datasets where the shard key changes monotonically. However, hash sharding does not provide efficient range-based operations.
Dump MongoDB !! Here’s more into it !! ~~> ~~>
Implementing Shards
The most convenient and cost-effective method to deploy and manage a shard cluster is using MongoDB Atlas. It is a Database-as-a-Service solution that simplifies shard cluster implementation.
But, you can also do it manually. Just replace everything between < and > with the appropriate values for your setup. So, let us see an example where we will set up a config server and multiple shards, on three-node replica sets, as well as a Mongos server. So, let’s start right away.
Set up config server
Note that one Config server replica set can have upto 50 Mongos processes. But, with a few exceptions such as: no arbiters and no zero-priority members. Let’s take an example:
mongod --configsvr --replSet <configReplSetName> --dbpath <path> --port 27019 --bind_ip localhost,<hostname(s)|ip address(es)>

# Now, connect to a member from the replica set
mongo --host --port 27019

# Now, run rs.initiate() on any one member
rs.initiate(
  {
    _id: "<configReplSetName>",
    configsvr: true,
    members: [
      { _id : 4, host : "<cfg4.example.net:27019>" },
      { _id : 5, host : "<cfg5.example.net:27019>" },
      { _id : 6, host : "<cfg6.example.net:27019>" }
    ]
  }
)

# Now, that the config server replica is set up, we will create the shards.
Set up Shards
By now, we know that a shard is a replica set unto itself. This process is similar to the Config servers, but using the –shardsvr option. Be sure to use a different replica set name for each shard.
mongod --shardsvr --replSet <shardReplicaSetNamereplSetname>  --dbpath <path> --port 27018 --bind_ip <cluster hostname(s)|ip address(es)>

# Now, connect to one of the replica set members
mongo --host <hostname> --port 27018

#Next, run rs.initiate() on any member of the replica set
rs.initiate(
  {
    _id: "<shardReplicaSetNamereplSetnamereplSetName>",
    members: [
      { _id : 4, host : "<shard-host4.example.net:2701827019>" },
      { _id : 5, host : "<shard-host5.example.net:2701827019>" },
      { _id : 6, host : "<shard-host6.example.net:2701827019>" }
    ]
  }
)

# Next, we need to start the Mongos
Start Mongos
Now, that the congif server and the shard-server is set, let us continue with the process and start Mongos. Note, we have to point this mongos to the config server.
mongos --configdb

<configReplSetName>/<cfg4.example.net:27019>,<cfg5.example.net:27019>,<cfg6.example.net:27019> --bind_ip localhost,<cluster hostname(s)|ip address(es)>

# Note, we shall start with more than one Mongos to avoid bottlenecks and also to make the case of high availability.
Configure and Enable Sharding
# Connect to the Mongos:
mongo --host <hostname> --port 27017

# Now, add the shards to your clusters (have to do it for as many shards):
sh.addShard( "<shardReplicaSetName>/<shard-host4.example.net:27018>,<shard-host5.example.net:27018>,<shard-host6.example.net:27018>")

# Enable sharding:
sh.enableSharding("<database>")

# Now, we have to shard the collection, for which we can use hashed sharding:
sh.shardCollection("<database>.<collection>", { <shard key field> : "hashed" , ... } )

# If you want to use Ranged Sharding, you can do as below:
sh.shardCollection("<database>.<collection>", { <shard key field> : 1, ... } )
That’s it! We have sharded our first cluster.
Note: Any application interaction from hereon must only be done using the routers/Mongos instances.
WRAPPING UP !! ~~> ~~>
In this post, we have seen what is sharding, and also the various advantages of sharding. Thereafter, we also saw what and when to shard and adding onto it we even saw how to implement sharding in MongoDB. So, just enjoy this post and take back the learning as much as you can. On that note, until next time, see ya !! Goodbye !! ~~> ~~>
:: ~~> ~~> :: ** :::::: ** :: )) ** :: ** (( ~~> ~~>