Do you know how to share a Facebook group link or invite? If your answer is yes, then, that’s good. But, even if your answer is negative, do not worry at all. I am here to make you aware of that, isn’t it?
Facebook has so many great features that other social networks do not have. And this is the reason why Facebook is becoming more famous day by day. Facebook Group is also an amazing service that connects millions of people in a family. To connect people and promote Facebook Group, we need to share the link of Facebook Group. So, let’s get into great depth in the subsequent sections.

Facebook Groups
One of the most useful features of Facebook groups is the ability to share content with other group members. All members can usually upload media files and share them. However, you can also block content in groups so that no one but the administrators can post new material. For example, if you create a group for a development team in your company; you can let anyone join that group to receive updates, but only the developers shall be able to post content.
How to create a Group on Facebook
- Click “Home” in the Facebook navigation bar.
- Then, click on the “Create Group” link to open the “Create New Group” dialog box.
- Next, you need to give the name of the group in the “Title” box.
- Thereafter, enter the names of the group members in the Members field and select the members from the drop-down menu.
- Next, tap on the “Create” button.
- The Group page opens; and, now you may click on Settings and go to Edit group to edit the group settings.
- Thereafter, click on the “Only administrators can post to the group” button to make for this permission.
- Finally, click on “Save”.
- That’s it! You can now relax and enjoy your group interactions.

Getting the Facebook Group Invite Link
Follow the steps given below:
- Go to the Group you want to get the invite link for.
- Find any post
- Then, click on the post’s option on the right side.
- Next, copy the link to the post by clicking on the “Copy Link” option.
- Thereafter, you need to paste the copied link to a notepad.
- Then, remove all the text starting from permalink to the end, thereafter.
- Say, the link of my post is https://www.facebook.com/groups/ 2021716232261456/ permalink/221321959423345/?app=fbl(https:// www.facebook.com/groups /2021716232261456/permalink/221321959423345/?app=fbl).
- Then, after removing the permalinks my final link will look like https://www.facebook.com/groups/2021716232261456
- Copy this link and hurray, you have successfully rendered your Group invite link.
- Thereafter, you can share the link or do anything that you want with the link.
- Enjoy!
How to Share a Facebook Group Link
- Go to your group.
- Then, click on the “share” icon (one with peculiar tentacles coming out)
- Tap on Share > Proceed to “Copy Link”
- Thereafter, you can share it to anybody by pasting this link in your chat/message. As, the link has already been copied to your clipboard.

Creating a Specific Custom URL for your Groups
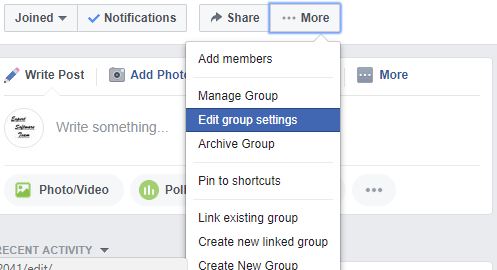
- Access your group settings by clicking on the “More” button.
- Then, go to the “Edit Group Settings” option.
- Look for the “Customize Address” button.
- Thereafter, in the Web Address section, tap the “Change Address” button.
- Now, enter the URL of your page in the window that pops up.
- Enter a name in the “facebook.com/groups/” field. This will be the custom URL, i.e. the specific address to your group created by you.
Deleting a Group
Deleting a Facebook group is a bit tricky due to lack of a proper “Delete” button/option. Also, note that only the original admin of the group can completely delete it. So, let’s see the steps to delete a Facebook Group:
- Open the Group
- Then, proceed to remove all the members of the group, one by one.
- Click on the edit option beside the member’s name > Click on “Remove” > “Confirm”.
- Finally, leave the group after every members’ disbanding is done.
- Click on the “Edit” button next to your name.
- Then, click on “Leave Group”.
- That’s it! your beloved Group is no more!
WRAPPING UP !! ~~> ~~>
By now, it is probably clear to you how to share a Facebook Group link. If indeed it is clear, then I am worthy of congratulations. Also, I will like to commend myself that my efforts have borne fruit. Anyways, if you do have anything to share related to the topic; or face any queries, you can without hesitating ping me in the comments section. On this note, until next time, see ya!! Goodbye !! 🙂 ~~. ~~>
::~~> ~~> ** :::::: ** ::))::((~~> ~~>