
We all know about Microsoft Excel and various tricks in Excel. On that note, in this post, we will learn about how to extend a table in excel. If you work with raw data, there is hardly a better tool than Microsoft Excel. It provides opportunities like using and creating pivot tables, customizing calculation functions, and using various other formulas too. However, much of it starts with a simple table, and knowing how to work with it, is key to visually representing your data. So, in this article, we will learn how to extend tables in Excel. But, before we move onto tables first let us know a bit about MS-Excel.
What is MS-Excel?
It is a spreadsheet application by Microsoft for Mac, Android, iOS, and Windows. Microsoft Excel features various functions used for calculations, pivot tables, Visual Basic Applications, and also visualization tools like charts. It is also a component of the MS Office suite.
Tables
Tables in Excel are simple to create and can even be easily modified as new data becomes available. You will probably need to resize or expand a table in Excel more often than not. In this article, we will thus see some different ways to do that.
How to extend a Table in Excel
There may be times when you will need to extend a table in Excel, maybe when performing calculations or other certain tasks. There are various ways to extend a table, so let us see these methods.
Expand by typing
The easiest way to expand a table in Excel is to simply type in a cell below or to the right of it. MS-Excel will then automatically create a new row or column for the new data:
- Start typing in the cell to the right of the last column of the table to add a new column.
- Thereafter, start typing in the cell below the last row of the table to add a new row.
Expand by dragging
Another way to expand a table in Excel is to drag the small arrow at the bottom right of the table. The table will then be adjusted to fit the cells you drag over. Let’s see how:
- Find the small blue arrow in the bottom right corner of your table.
- Thereafter, click and drag the arrow down to get more rows, or to the right to get more columns.
Want to view a private Twitter account? Join me here to learn about it!!
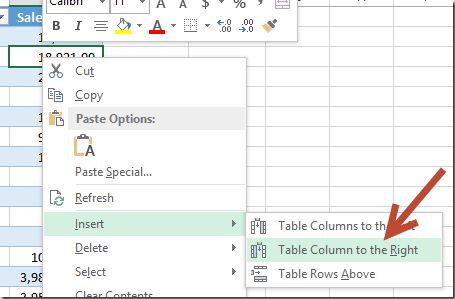
Use Right-Click to expand a table
You can also use right-click on a table and add a single row or column at a time. Let us see how:
- Right-click anywhere in the table.
- Now, move the mouse cursor over Insert.
- Thereafter, select either Table columns left/right for more columns or Table rows top/bottom for more rows.
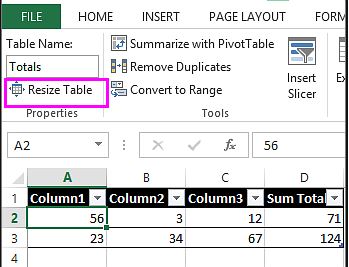
Use table tools to expand tables
One more approach, that you may try is using the table tools options. On the Table Tools tab, you can resize a table using the Resize Table button. Let us see how to do that:
- Click anywhere in your table so that the Table Tools tab appears.
- Thereafter, click on the Design tab under Table Tools.
- Next, on the far left of the ribbon, select Resize Table.
- Then, select the first cell of your table and drag it to the desired new table size.
- Finally, click on OK.

Extending a table in Excel for the Web
The above methods should work in Excel for the Web, but you can also resize a table manually on the Table Design tab :
- Click anywhere within the table so that the Table Design tab appears.
- Then, click the Table Design tab and select Resize Table on the far left of the ribbon.
- Finally, enter a new range of cells for your table and click Ok.
Changing the AutoCorrect Settings
To correct the tables to automatically expand to include new rows or columns, do the following:
- Click the File tab at the left end of the Ribbon.
- Then click on Options.
- In the Excel Options window on the left, click Corrections.
- Thereafter, in the AutoCorrect Options area, click AutoCorrect Options.
- Next, click the AutoFormatting tab on Input – you are finally at the settings!
- Now, put check marks at “Insert new rows and columns in table” and “Fill formulas in tables to create calculated columns”.
- Finally, click twice on OK to return to Excel.
- That’s it! You have successfully been able to expand your table.
WRAPPING UP !!
In this post, we have seen what is MS-Excel and what are tables. Sometimes, while working with tables we may need to enter more than the pre-defined data in rows and columns and will thus require to perform table expansion. So, here we have seen various methods we can employ to expand a table in Excel too. On that educative note, until next time, see ya!! Goodbye !! ~~> ~~>
:: ~~> ~~> :: ** :::::: ** :: )) :: (( ~~> ~~>