Folders are a must for organizing your Gmail inbox or for that matter any email inbox. Gmail uses labels instead of folders, these are though basically the same thing. But unlike folders, you can assign more than one label to an email in Gmail. In this blog post, here, we will look at how do I create a folder in Gmail.
How do I create a folder in GMail
To make use of a label in the mode of a folder; we can use the option stating “Move To” to move an email from the inbox to the said label. For example, you can move all work-related emails from a particular client; to one folder and emails related to wedding planning to another. You can even nest labels under other labels that work like subfolders.
Now, let’s see how we can do this :
Creating a Gmail Folder on your desktop
- Open Gmail.
- Now, login into your Gmail account.
- Click the gear-shaped Settings icon in the upper-right corner of the screen, then select View All Settings.
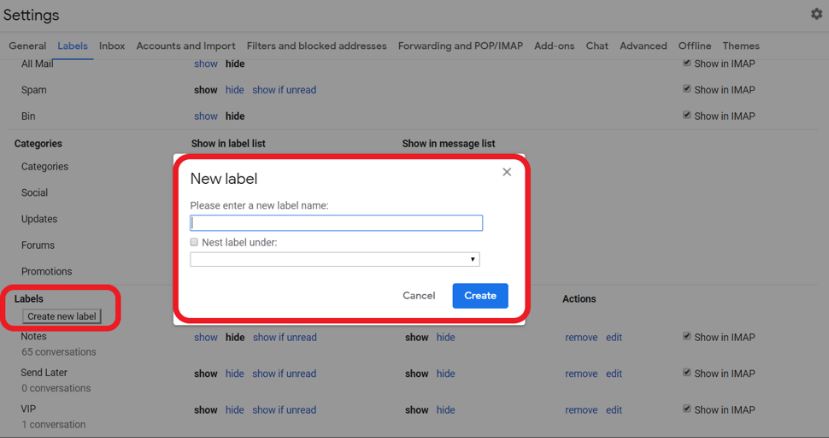
- Now, go to “Labels” tab and reach out to “Labels” section and then select “Create New Label”.
- Type the name of the label you want, and then click Create.
- If you want the new label to be placed under an existing label; click the box next to Place label under; and, select the folder you want the new label to be placed in.
Creating a Gmail Folder in Gmail App
- Click and open your Gmail App.
- Thereafter, login into your Gmail Account.
- Now, tap the three horizontal lines in the top left of the screen.
- Scroll down to the “Labels” section, and then tap “Create New Label”.
- Now, give the name of the label as per your wish and then click on Done.
- Hurray! you have accomplished your task.
Applying Labels
- Open your Gmail inbox.
- Check the checkox next to your emails in the inbox and now click on “Label”.
- Thereafter, go to “Create new Label”.
- Type the name of the label you want, and then click Create.
- If you want the new label to be placed under an existing label; click the box next to place label under; and, select the folder you want the new label to be placed in.
- Hurray! you have accomplished your task.
Note: You can also apply Gmail Labels to your inbox emails using Filters.
Automatic Labelling
- Open your Gmail inbox.
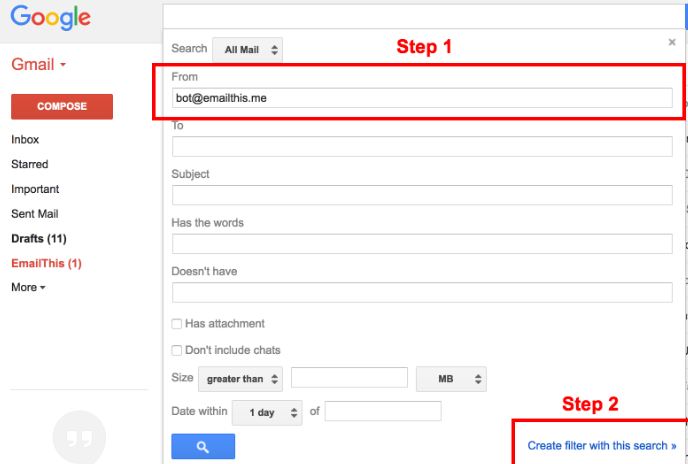
- Click on search option and look for labels.
- Set the criteria for Labels filtering.
- Note, you can filter by From, To, Subject, Has the words, Has not, Size, and Date.
- After you have set the criteria, click Create Filter.
- Thereafter, click on Apply Label while selecting the desired label from the menu.
- Thereafter, go to “Create Filter”.
- Hurray! you have accomplished your task.
Gmail Account Availability Checker !!!
How to format Labels
On Desktop
- Open your Gmail inbox.
- Now, click the gear-shaped Settings icon in the upper-right corner of the screen.
- Then, select View all settings.
- Now, go to “Labels” tab and move down to “Labels”.
- To edit a label, click the label name, type the new name, and then press Enter or Return.
- Alternatively, you can click the appropriate Edit button on the Actions tab.
- You can also change the nesting properties of a label in this window.
- To delete a label, click the corresponding Remove button on the Actions tab, and then click Delete.
- Finally, the task is accomplished.
On App
- Open Gmail App.
- Tap the icon with three horizontal lines in the upper-left corner next to the search bar.
- Scroll down and tap Settings.
- On the next screen, select the email address you want to make the change for.
- On the next page, scroll down and select Label Settings in the Labels section.
- Now, tap on the label that you will like to format/delete.
- And, do accordingly as your wish.
- Thus, now your task is accomplished.
WRAPPING UP ..—… How do I create a folder in Gmail
Thus, in this blog post, we’ve seen and looked at some methods; that we can utilize to create folders and labels in Gmail. We now know how to segregate our emails on the desktop and also on the Gmail app. We have seen how easy it is to use these methods and complete our work. Hope this post is of great usage and importance to you and helps you deal with your adventures. So, continue using these tricks to label your emails and create folders. Thus, segregating the emails as per your desired criteria and parameters. Until there next time, see-ya! 🙂