In this blog, we will talk about how to undervolt GPU. But let’s first talk about what is undervolting. Undervolting is the process of lowering the operating voltage of the CPU or the GPU. Many of the different factory overclocked cards tend to ship with higher voltages. There are many different times when people don’t require this increased power consumption and often leads to increased temperature limits.
There is also a benefit of Undervolting it helps you regulate the voltage limit and maintain a good temperature. In mobile devices and other laptops where the energy is delivered from a battery. Undervolting helps preserve the battery life without even putting a dent on performance.
Also Read: How to fix a cracked computer screen without replacing it
Is Undervolting safe?
Absolutely yes undervolting is safe. We can assure you that there won’t be any hardware issues if you do it the right way. We will even say that it will provide your GPU and CPU with an extra life span because it is working at a lower voltage and temperature. Let us tell you it is well worth your time.
Should you Undervolt your GPU and CPU?
If you have a laptop we suggest you undervolt it. There are hardly any downsides of undervolting and you will be able to increase the life span of your laptop as well.
If you have a small form factor PC case. We will suggest you undervolt because it maintains optimal temperature without any performance issues. Also, if you enjoy doing high-graphic things like crypto mining and gaming. We suggest you undervolt your CPU and GPU.
Underclocking vs Undervolting
Underclocking means lowering the clock speed of the GPU. On the other hand, undervolting means reducing the operating voltage of the GPU. Undervolting is considered better than underclocking because decreasing clock speed can harm performance in comparison to decreasing voltage. So, if you are able to undervolt without underclocking then a lot of power and energy will be saved without effecting performance. But you also have the option to underclock as that will allow you to undervolt even more although at the price of lower performance. We suggest you better stick with Undervolting for better performance.
Pros of Undervolting
- It preserves battery in case of laptops.
- There is no decrease in performance.
- It also consumes less power.
- It generates less heat comparatively.
- This will prevent thermal throttling.
- It generates less noise too.
- It can increase hardware lifespan.
How to undervolt your CPU?
- Firstly, we will use Throttlestop software in this case.
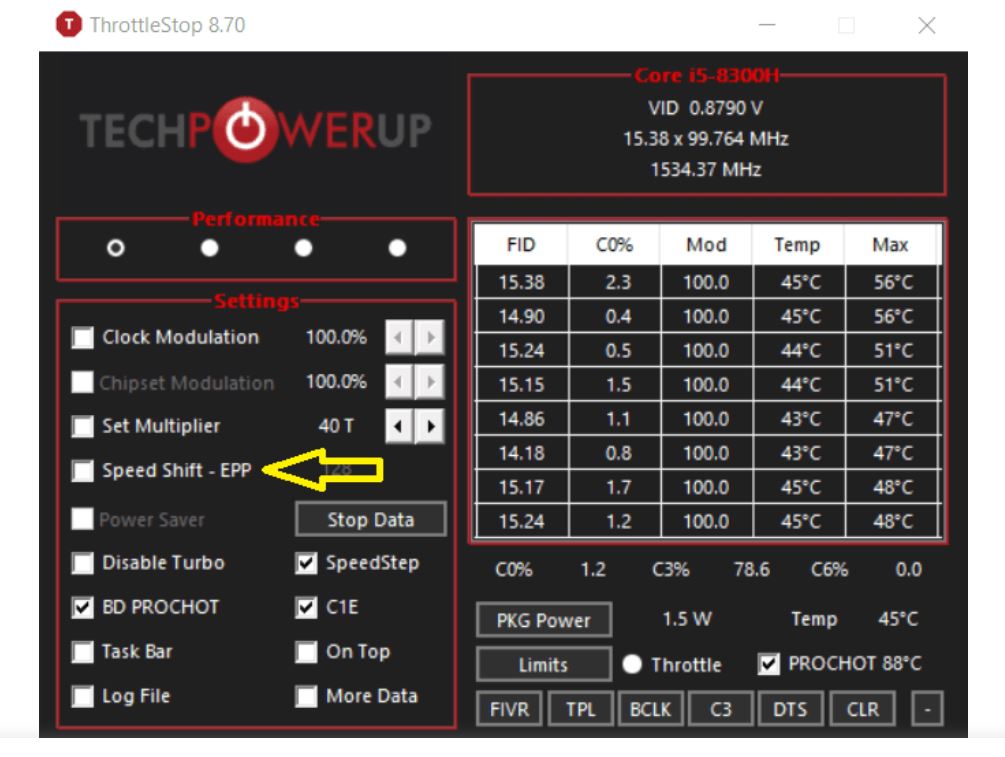
- Secondly, you have to tick the option of “Speed Shift – EPP” under settings. This will enable Intel’s Speed Shift technology and result in better battery life and smoother performance.
- Now lets try to get a base value for our temparatures. You just have to press “TS Bench” and it will start the test. Please keep an eye on the temperature values during this test. Then, we will start with Undervolting.
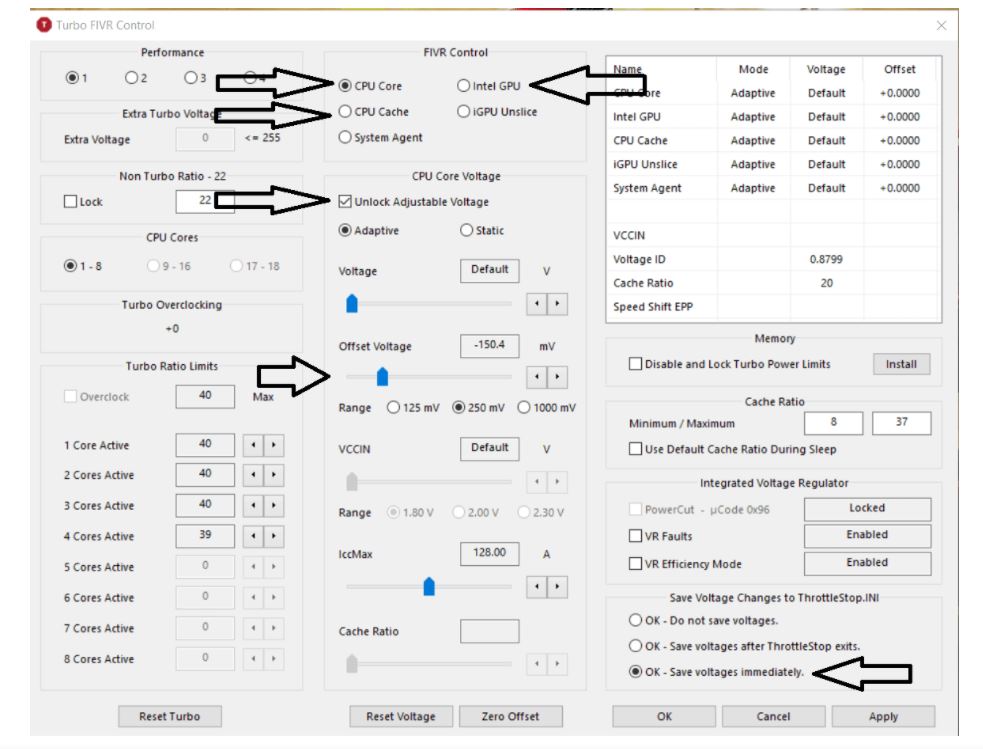
- You have to click on “FIVR”. It will open a menu through which you can undervolt our CPU.
- Now do a first click on “OK-Save voltages immediately.”
- You have to click on “Unlock Adjustable Volage” and undervolt the CPU core, CPU Cache and Intel GPU by – 100mV initially using Offset Voltage slider then hit on apply.
- In case your laptop crashes at – 100mV, you have to try with -80mV. You should keep on increasing the value by 20mV until you are stable without any crashes. The laptop will restart itself as crashing is a part of the process so don’t worry.
- On the other hand, if your laptop is stable at -100mV, you should start adding -10mV until the system crashes. Before experiencing any crash, the last stable setup will be your undervolt limit. Every laptop limit has a different value, ours was – 150mV.
- Now, you have to click on Apply and OK.
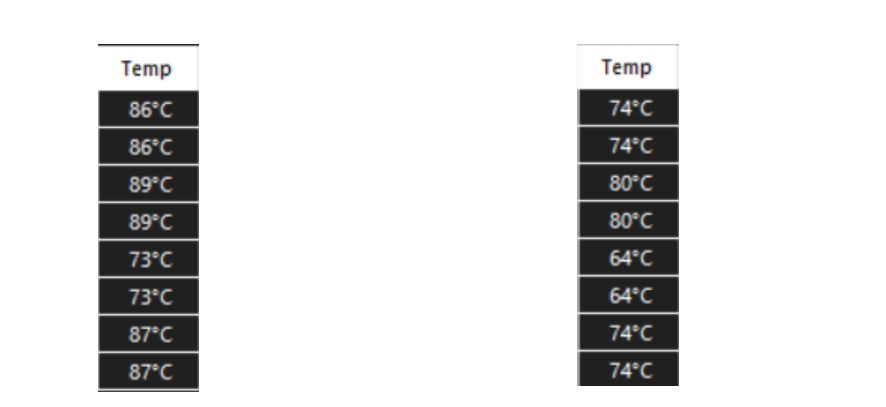
- You have the option to run a benchmark test with “TS Bench”. You should observe the temperature values. The undervolted temperature values must be less than the original values we noted earlier. In case of any error, you just have to increase the undervolt value by 10mV and run the benchmark again. Below mentioned are our temperature values before and after undervolting.
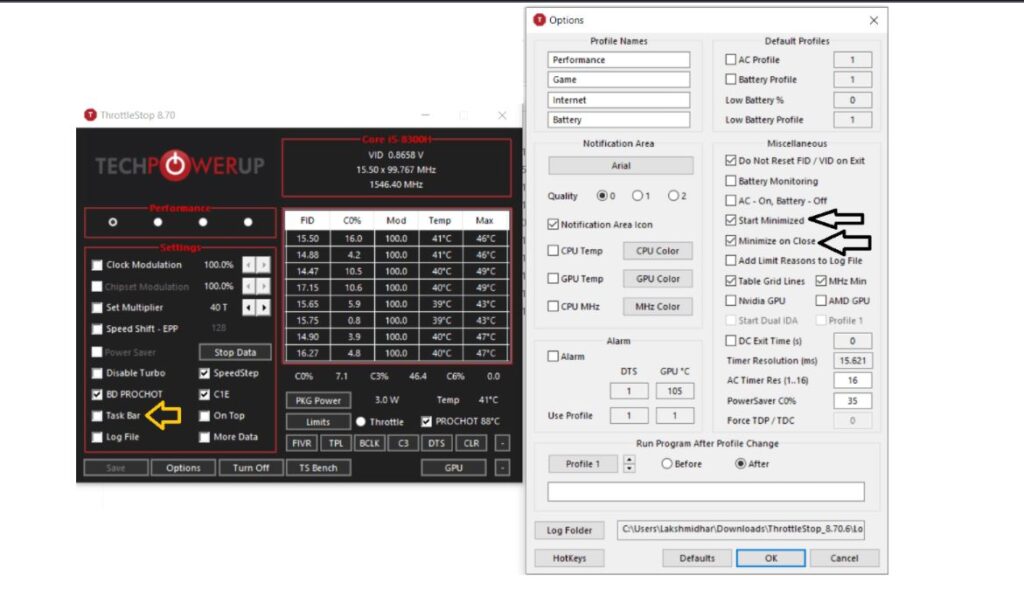
- Now we will be showing you how to minimize and keep Throttlestop in the notification area rather than on the taskbar. We will also talk about how to launch Throttlestop at start-up so that you dont have to do it manually every time you start your computer.
- Now firstly, you need to uncheck the “Task Bar” option and click on options. Here, select “start Minimized” and Minimize on close”. Now lastly, you need to click on “OK”.
- After that when you close the Throttlestop it will keep showing in the notification area rather that than the taskbar.
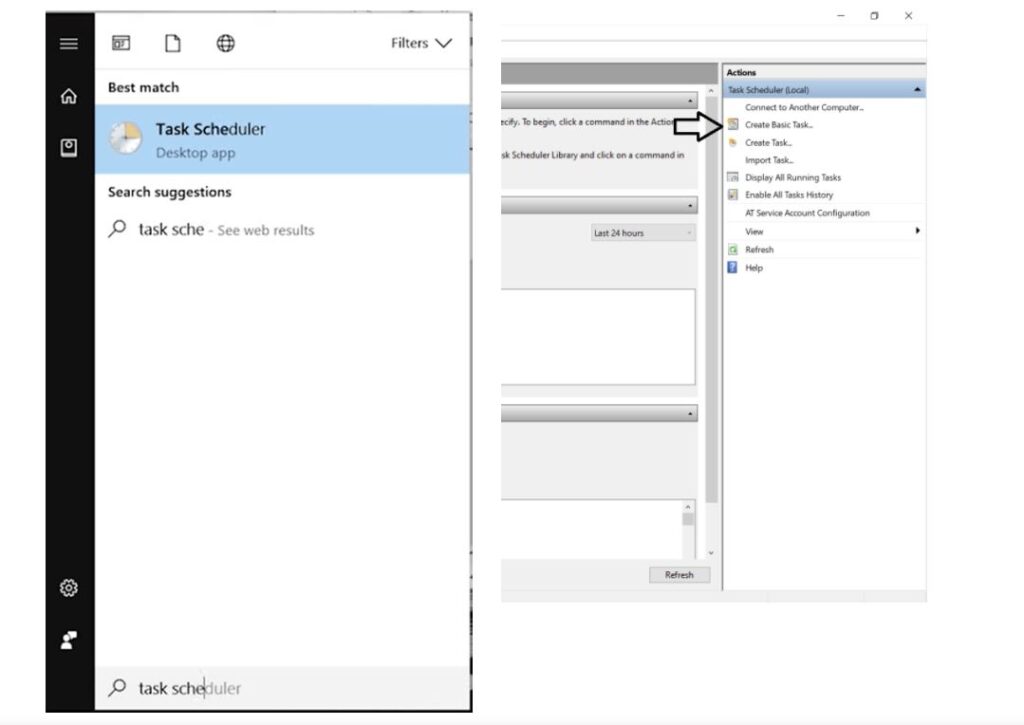
- Now let’s setup Throttlestop for the start-up.
- After that you need to open the “Task Scheduler” from the start menu and then click on “Create Basic Task” under the “Actions” bar on the right hand side of the screen.
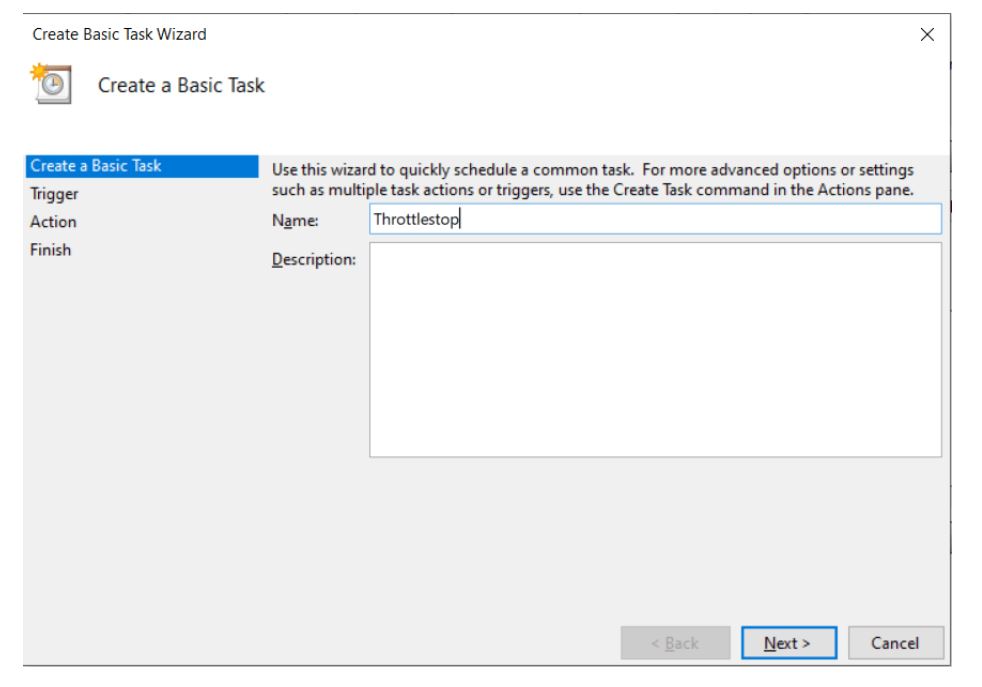
- After that you enter the name as “Throttlestop” and then click on next.
- Now for the trigger you need to select “When i log on” option and after that tap on the next.
- After that for action you need to choose “Select a program” and then tap on the next.

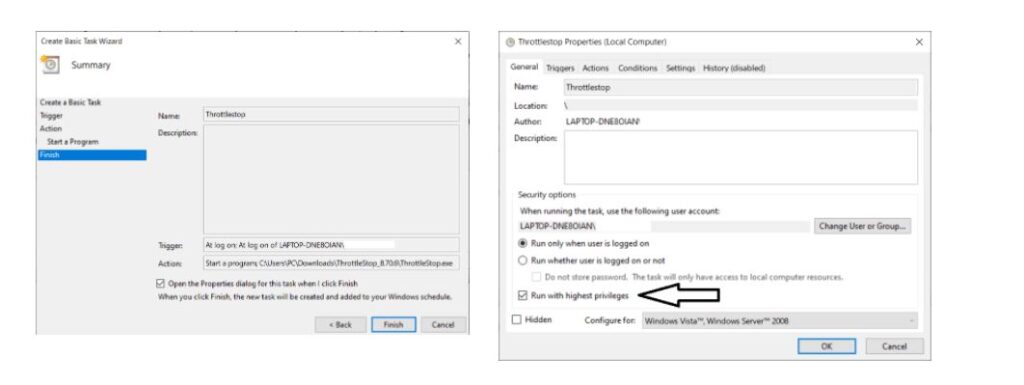
- After that select browse and then select the Throotlestop.exe file which you must have downloaded earlier. Now open and select “Open the properties dialougue for this task when you click finish option”
- Now in the properties tab you need to choose the “Run with highest privileges” and you are done.
This is the complete process through which you can undervolt your CPU easily.
How to Undervolt your Nvidia GPU
Before we get started let’s clarify one thing first. Here are some things you should keep in mind. You can’t undervolt your Nvidia card if it is below 10 series. Also, if you couldn’t open the frequency/voltage curve editor in MSI. Afterburner maybe it’s because of this reason.
There is also one reason that every card is different. Even if you and us both go and buy the same model GPU from the same manufacturer. Then also our undervolt limit will not be the same.
This is mostly due to silicon chips, environment temperature, different cooling system. Keeping these points in mind here is how you can do it.
- In order to undervolt your GPU firstly you need a MSI afterburner. You can easily download it from here.
- Now we will provide you with the core idea of undervolting we want our GPU to use higher frequncies at a lower voltage set.
- Now you should determine the maximum frequency of your specific GPU. You can find this out by using the HWiNF064 software. You can download it from here and then run it in sensors-only mode. This is my max voltage and frequency before gaming.

- After that you need to open a high graphic game and then find out what your maximum clock frequency is and the voltage it runs at. That will be your max voltage and frequency after gaming.

- In the MSI after burner click “Ctrl+F”. You will be able to see a voltage/frequency curve editor graph. Here is ours.
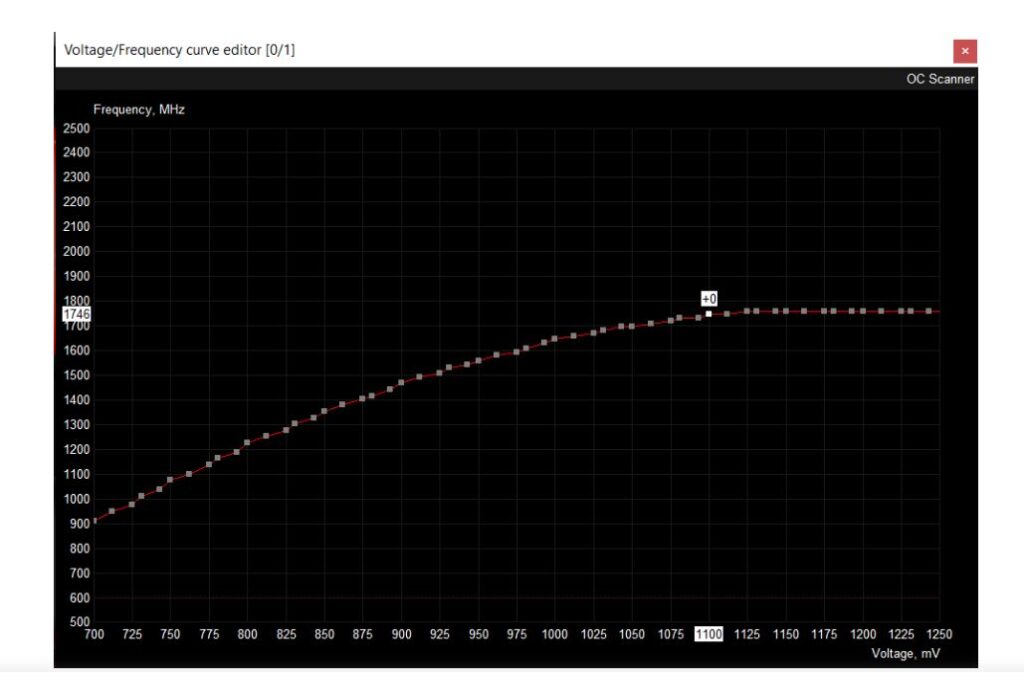
- Now you need to find the node corresponding to max frequency point after the gaming (1750MHz on the y-axis) and then look at the corresponding voltage (1100mv on the x-axis) and using the mouse printer bring the nodes next to it up to the same level (to 1750MHz).
- Then lower the voltage by 100mv in the scenario of 1750MHz is the max frequency and 1100mv is the corresponding voltage. Now all you need to do is drag all the nodes after 1000mv voltage to 1750MHz in frequency. You have to do it all manually. Let us tell you this will take some time.
- Now you need to re-test the configuration by playing games and see if it is stable or not. For us it was stable so we reduced the voltage 50 mV to 950mV.
- Then you need to drag all the nodes after 950mV to boxes at 1750MHz and then test this configuration. Now if it stable you need to reduce the voltage by 100mV to 850mV and then test it again until you face crashes or stuttering. This is how our graph looks.

- If you are facing graphic crashes and also stutter then increase the voltage in the curve until your performance is stable. Well, let us tel you this is a part of the process and there is nothing to be afraid of. You just need to keep calm and keep tweaking the graph until you find your stable point.
- Now click on the tick button to apply the cahnges to the MSI afterburner.

- In order to save this profile, you have to click on Save and choose a slot of your choice. When you want to play a game undervolted next time then you just have to open MSI afterburner and click on the ealier alloted slot for loading the undervolted settings.

Conclusion
In this blog, we have taught you ‘How to Undervolt GPU: Everything you need to know.’ We are sure that you will see decrease in temperature, increase in FPS and no throttling if you do as you are told in the blog. Thank you for reading our blog!