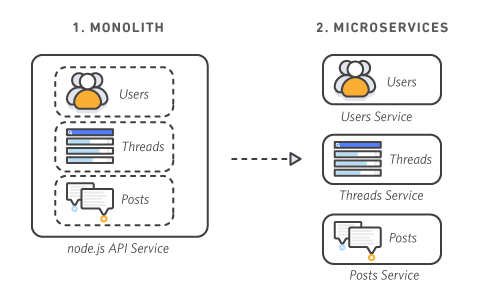
In software application development microservices kind of service-oriented architecture and ab is structured on an interconnected services platform. With microservices, the creation of applications is lightweight protocols and so it becomes very easy. They are far better than Monolithic architecture. Also, you will not need to add software components and services in one big container and pack them with microservices with node js which you can also use to create applications with –
- Better flexibility
- Higher scalability
- Continuous development
- Systematically organized data
- Time Optimization
- Reliability
Creating JavaScript application with the help of microservices ensure that you can focus on the development of monofunctional models that have clearly defined operations and accurate interfaces. The application development process becomes easy and also agile as the challenges of creation reduces greatly.
When working with Monolithic architecture the complete application will need to be released with the upgrades. Instead, microservices have no side dependency on the type of network, framework, or programming language used to create them. You can also release a package of applications for communication and other services and it can easily work with your remaining application.
Node JS platform
When you want to create JavaScript, a number of developers use the node.js platform. In JavaScript engine, a cross-platform, open-source Runtime environment that use to create networking and server-side applications. Node JS can also execute on Microsoft Windows, OS X, Linux operating systems within node.js runtime easily.
Why use microservices with node JS?
The database of JavaScript module node.js simplifies the development of microservices enormously. Software developers also use node js as a technology for developing JSON-based applications, IO-bound applications, data streaming applications, single-page applications, and data-intensive real-time applications as well.
Major benefits of using node JS
- Single-threaded – With the event looping the server only uses a non-blocking mechanism to respond which simplifies the process.
- Super-fast – Coding in node JS can also execute very quickly with the help of the V8 JavaScript engine.
- Event-driven – node js is a simple notification system that helps the application service to capture the response of the previous API calls the helping in the management of data.
- Buffer – less – no buffering as data released in small chunks and not big packets.
- Asynchronous – node js’s non-blocking, non-synchronous libraries to the next API and do not wait for the processing of data from the previous API.
- Very scalable – with node js service can handle as many requests as possible and coming their way, so it can be very helpful in scaling your business.
- Licensed – also this program, authorized under a software license. Microsoft, PayPal, Ube, eBay, and Yammer are leading companies that are using node.js application development for their recent upgrades and projects.
Creation of microservices with node js
To create microservices for real-world applications with the help of node.js a basic understanding of the JavaScript programming language is very necessary. The steps that are used in the development of microservices with node.js is how to work at applications in our hyper-connected world and perform and well constructed with point shall combination of multiple unique API is it can be one of the best operational functions of your application along with the unique APIs.
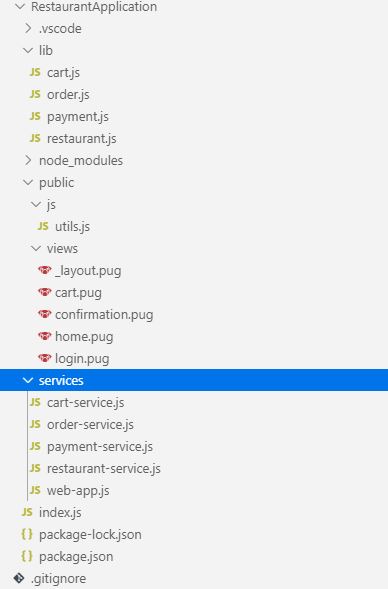
Scaffold the Node Microservices Project
- The process starts with building a new directory for your application
mkdir restaurant-application
cd restaurant-application
- After this, you will need to create a new folder for your services and code for the backend of your application. Seneca uses a word plugin for this code.
mkdir li
mkdir services
- Now you will need a folder for any public file including use JavaScript or CSS that your application will be delivering to the clients.
mkdir public
mkdir public/js
mkdir public/views
When you have set up your directory structure you are now allowed to add files that you will need to run the application.
Install the Node Microservices Dependencies
Now you can add dependencies that you will need for your project. You can install these packages from the node package manager.
- Firstly add the Okta OIDC middleware and the Nodejs SDK. This will help your interface to be very easy.
npm install @okta/oidc-middleware@2.0.0
npm install @okta/okta-SDK-nodejs@3.1.0
- Now you will need to add Express and Express session packages to your project. Express is a web Framework for nodes that offers features that experience for mobile and web applications.
npm install express@4.11.2
npm install express-session@1.17.0
- Now you will need to install a pug to render your views. You can opt for a different view engine but it is very simple.
npm install pug@2.0.4</em></a>
- Body parser that can extract the data from forms or JSON.
npm install body-parser@1.11.0
- You will need Seneca to help you communicate between your services. You will also be using this to include middleware for Seneca on your web application level and the Seneca-web-adapter-express to integrate Seneca with express. It offers adaptors for your Framework like happy but you will not need this for your project.
npm install seneca@3.17.0
npm install seneca-web@2.2.1
npm install seneca-web-adapter-express@1.2.0
Create Your Node Microservices
- Setting up your services is an easy part of the job. Now you need to add the following to cart – services.js –
require(‘seneca’)()
.use(‘../lib/cart’)
 .listen(10202)
- The file lib/cart is called a plugin in Seneca parlance.
- After this, you will need to look at other services to perform the same action and each service will use a designated plugin and will be listening on a different port.
- Set up the order service that will listen on port 10204.
require(‘seneca’)()
.use(‘../lib/order’)
 .listen(10204)
- After this you will need to add food for payment service that listens to port 10203.
require(‘seneca’)()
  .use(‘../lib/payment’)
  .listen(10203)
- At last, you will need to add a code for restaurant service that will listen to port 10201.
require(‘seneca’)()
  .use(‘../lib/restaurant’)
  .listen(10201)
Now you need to come back when you want to write the web application. You can also add payment plugins to see how this works.
module.exports = function (options) {
    var seneca = this
    var plugin = ‘payment’

    seneca.add({ role: plugin, cmd: ‘pay’ }, pay)

    function pay(args, done) {
        //TODO integrate with your credit card vendor
        done(null, { success: true });
    }

    return { name: plugin };
}
Wrapping Up
In this article, you have exported a simple plugin that can expose one method to external customers. This is the basic microservice with node.js. You can also integrate with your payment provider.