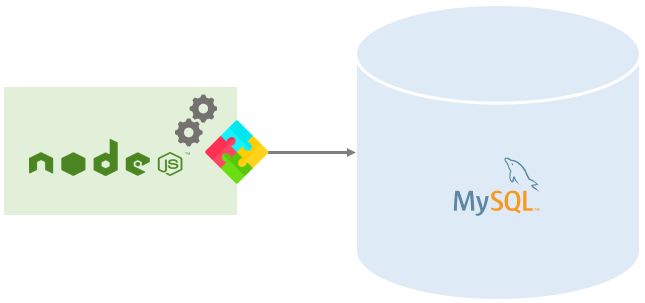
It is generally seen that Node.js is coupled with both MongoDB and other NoSQL databases. But it also executes well with relational databases like MySQL. And that why we are here to talk about Node js with MySQL. So, let’s say that you want to write a new microservice with Node.js for an exciting database. You will likely use the most popular open-source database in the world MySQL. We just want to say that Node js with MySQL go hand in hand they both complete each other.
Now in this tutorial you will learn with us on how you can build a Rest API with MySQL as the database and Node.js as our language. And to make our task easier we will use the Express.js framework. So, let’s dive into this exciting topic and learn together.
Also Read: Parallel python programming: Basic information
Prerequisites:
Down below are some of the assumptions we will be making before we jump into codes:
- We will learn to have a good understanding of how MySQL and relational databases work.
- Will also learn some basic things about Node.js and some understanding of the Express.js framework.
- You are aware of what REST (representational state transfer) APIs are and how they generally function.
- You will also learn about CRUD (update, delete, create, read) and how it relates to the HTTP methods GET, POST, DELETE, and PUT.
Note: All the code will be done using MacBook with Node 14 LTS installed. You can also try Node.js and Docker and docker-compose for a developer experience.
MySQL quick intro and Setup:
If you ask which is the best database in the world we will say MySQL. As per the 2020 Stack Overflow survey, it is one of the most used and loved with more than 55% of people using it. MySQL community edition is also available for free and it is used by the large number of people in day to day life.
It is a first attribute-packed relational database that was first released in 1995. MySQL also runs on all the platforms like macOS, Windows and Linux.
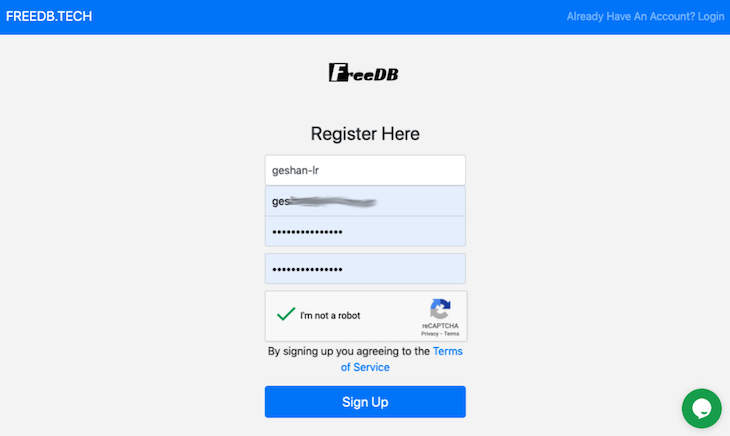
How to Register on FreeDb.tech
You can easily register on the Freedb.tech to get your free MySQL 8.0 database up and running by doing the following steps.
- Firstly, go to the Freedb signup page, then fill up the personal details and check the i am not a robot and click on the signup button.
- Then you will get an email to verify your email address. Once you click on the link you can create a database as follows.
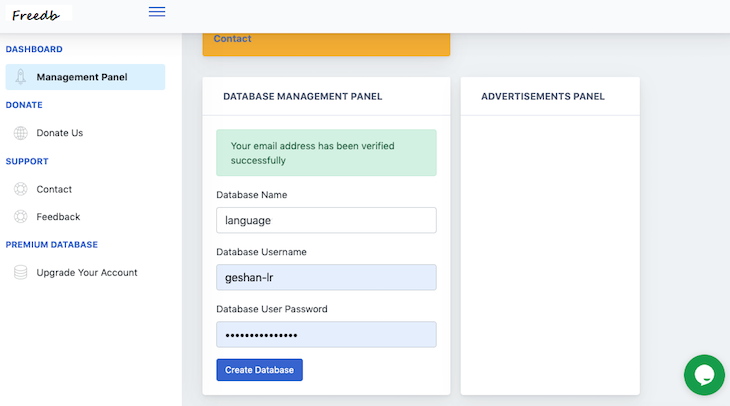
- Now after you click on the create Database. If your DB will be unique enough your database will be created. You should try keeping your DB name unique because if it will be common the database will not be created. Now if everything goes well you will see something like down below with all the credentials to connect to your newly created database:
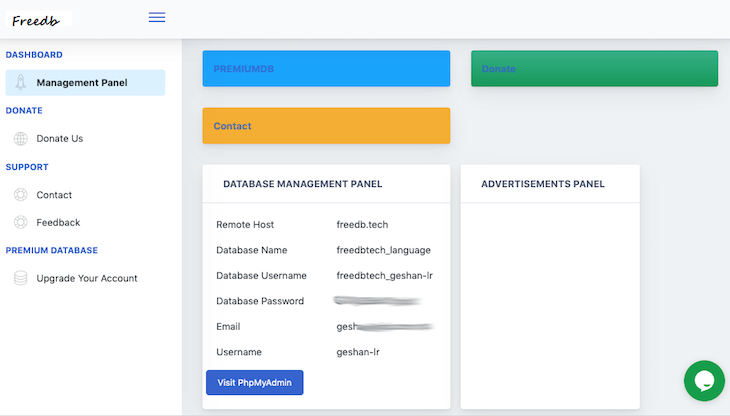
- Now just copy the password, username, and database name. You will require them in the next step. Then just tap on the Visit phpMyAdmin button.
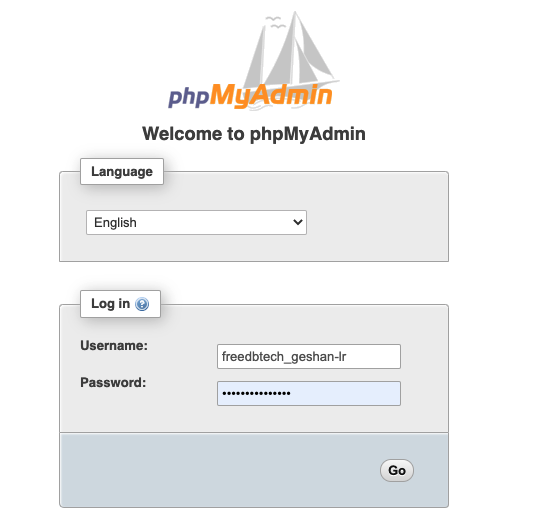
- Then when you visit the phpMyAdmin enter your password, username, and database name. And then click on the GO just like as seen in picture below:
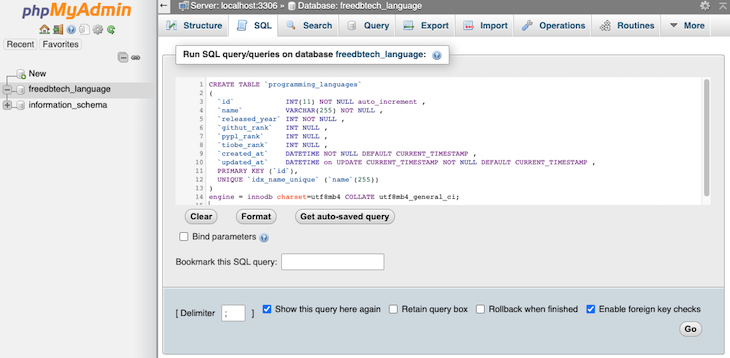
You can also create programming languages table:
Now once you are done with creating your database. Now let’s add the programming_languages table. To achieve the programming language table click on the database name on the left; for us it was codebender_language. After that click on the SQL and put the following CREATE TABLE SQL in the text area:
CREATE TABLE `programming_languages`
(
  `id`            INT(11) NOT NULL auto_increment ,
  `name`          VARCHAR(255) NOT NULL ,
  `released_year` INT NOT NULL ,
  `githut_rank`   INT NULL ,
  `pypl_rank`     INT NULL ,
  `tiobe_rank`    INT NULL ,
  `created_at`    DATETIME NOT NULL DEFAULT CURRENT_TIMESTAMP ,
  `updated_at`    DATETIME on UPDATE CURRENT_TIMESTAMP NOT NULL DEFAULT CURRENT_TIMESTAMP ,
  PRIMARY KEY (`id`),
  UNIQUE `idx_name_unique` (`name`(255))
)
engine = innodb charset=utf8mb4 COLLATE utf8mb4_general_ci;
Now just click on the Go button as seen in the image given below and its done.
Now it will return with a green check box and a message like MySQL returned an empty result set (i.e. zero rows).
Your table is created named programming_languages with eight columns. The table has a primary key id, which is internet and auto-increment. The column name is unique.
As you can see we also added released_year for the programming language. We have three columns that will input the rank of the programming language from:
- PYPL – The PopularitY of Programming Language Index
- TIOBE index
- GitHut – GitHub language stats for Q4 2020
There are two different columns named created_at and updated_at which keeps track of when the rows were created and updated. We just want to create an API of the most popular programming languages as posted in the above three sources.
Add 16 demo rows:
The next thing we are going to do is add 16 of the most programming language in our programming_languages table. Now again click on the SQL link on the top and copy/paste the SQL below:
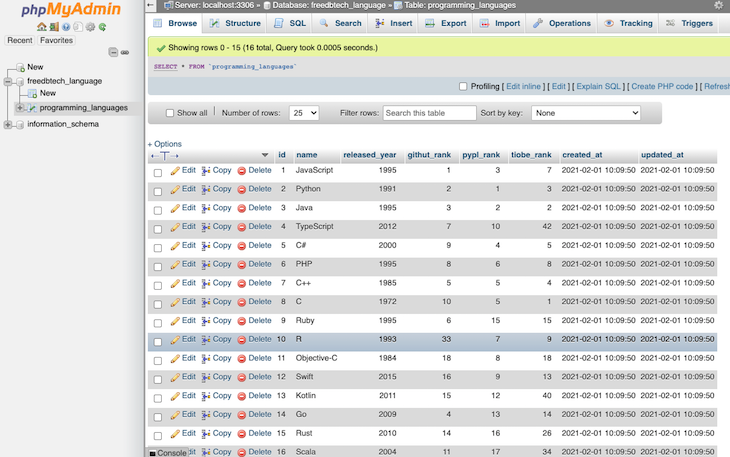
INSERT INTO programming_languages(id,name,released_year,githut_rank,pypl_rank,tiobe_rank)
VALUES
(1,'JavaScript',1995,1,3,7),
(2,'Python',1991,2,1,3),
(3,'Java',1995,3,2,2),
(4,'TypeScript',2012,7,10,42),
(5,'C#',2000,9,4,5),
(6,'PHP',1995,8,6,8),
(7,'C++',1985,5,5,4),
(8,'C',1972,10,5,1),
(9,'Ruby',1995,6,15,15),
(10,'R',1993,33,7,9),
(11,'Objective-C',1984,18,8,18),
(12,'Swift',2015,16,9,13),
(13,'Kotlin',2011,15,12,40),
(14,'Go',2009,4,13,14),
(15,'Rust',2010,14,16,26),
(16,'Scala',2004,11,17,34);
After you have inserted the rows it should say 16 rows inserted.
We have collected all the best programming languages from the three soureces:
- TIOBE Index.
- GitHut
- PYPL
The above data that is collected is in form of a table. The table contains 16 rows for the 16 programming languages in the table we just created. We will use this in later steps when we fetch data for the GET API endpoint.
Now if you click on the programming_languages table visible on the left, you will see the rows that we just added as follows:
After this is done now we will move on to the next step we will set up Express.js to proceed with our REST API with Node js with MySQL.
Setting up Express.js for REST API
Firstly, to set up a Node.js app with an Express.js server, we will have to make a directory for our project to reside in.
mkdir programming-languages-api && cd programming-languages-api
After that we will use a npm init -y to create a package.json file like below:
{
  "name": "programming-langugages-api",
  "version": "1.0.0",
  "description": "A demo REST API with Node.js Express.js and MySQL for most popular programming languages",
  "main": "index.js",
  "scripts": {
    "test": "echo \"Error: no test specified\" && exit 1"
  },
  "repository": {
    "type": "git",
    "url": "git+https://github.com/geshan/programming-langugages-api.git"
  },
  "keywords": [],
  "author": "",
  "license": "ISC",
  "bugs": {
    "url": "https://github.com/geshan/programming-langugages-api/issues"
  },
  "homepage": "https://github.com/geshan/programming-langugages-api#readme"
}
We have provided all the steps of code will be as a sequence and will pull requests accordingly. Side-by-side we will also install an Express.js by running npm i --save express. What this will do is add dependency in the package.json file.
The next we will carry out is create a slim server in the index.js file. Which in return will print an ok message on the main path /, like below:
const express = require('express');
const bodyParser = require('body-parser');
const app = express();
const port = 3000;

app.use(bodyParser.json());
app.use(
  bodyParser.urlencoded({
    extended: true,
  })
);

app.get('/', (req, res) => {
  res.json({'message': 'ok'});
})

app.listen(port, () => {
  console.log(`Example app listening at http://localhost:${port}`)
});
Let’s note down few things at this junction of the blog:
- In the following steps to parse JSON we will be using built-in
body-parser middleware - To also parse the URL encoded body we will be utilizing
bodyParser.urlencoded function - The app will run on port 3000 if port is not provided as an environment variable.
We also have the option of running the servers with node index.js and hit http://localhost:3000 to see {message: "ok"} as output.
Project Structure:
Now will discuss about the structure of our project, so that everything is done accordingly.
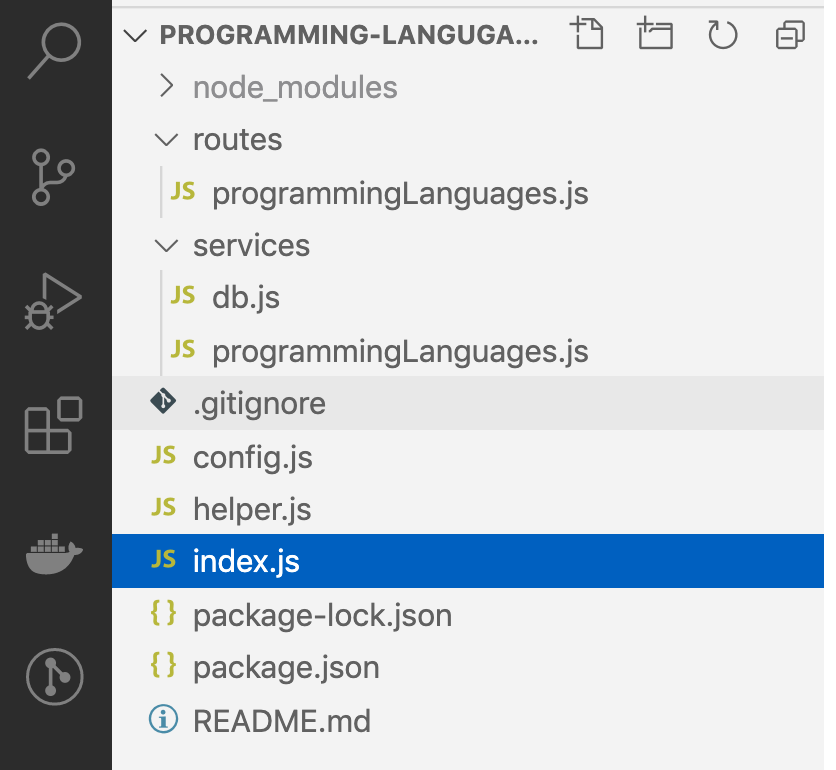
A quick sneak-peek into the structure of the programming languages API we are going to build.
helper.js: You can say that this is a home for any helper functions like calculating offset for pagination.config.js: This will have the configurations like the database credentials and how many rows are there per page. When we want to show the paginate results.routes/programmingLanguages.jsthis will act as a glue between the URI and the other functions likeservices/programmingLanguages.jsservice.
Let’s jump to code our GET programming languages API with pagination:
GET popular programming languages
Now to create our GET programming languages API, we will need to link up our Node.js server MySQL. For this we will use the mysql2 npm package. We can install this package easily with npm i --save mysql2 command on the project root.
Now in the nextprocess we will create the config file on the root of the project with the following contents:
const env = process.env;

const config = {
  db: { /* don't expose password or any sensitive info, done only for demo */
    host: env.DB_HOST || 'freedb.tech',
    user: env.DB_USER || 'freedbtech_geshan-lr',
    password: env.DB_PASSWORD || 'G2VjjQ5d47zyjqX',
    database: env.DB_NAME || 'freedbtech_language',
  },
  listPerPage: env.LIST_PER_PAGE || 10,
};


module.exports = config;
Along side will also create a helper.js with the code as given below:
function getOffset(currentPage = 1, listPerPage) {
  return (currentPage - 1) * [listPerPage];
}

function emptyOrRows(rows) {
  if (!rows) {
    return [];
  }
  return rows;
}

module.exports = {
  getOffset,
  emptyOrRows
}
This part is interesting in this part we will be adding the route and linking it up with the services. But, the first thing we will do is connect it to the servers and enable running queries on the database the services/db.js:
const mysql = require('mysql2/promise');
const config = require('../config');

async function query(sql, params) {
  const connection = await mysql.createConnection(config.db);
  const [results, ] = await connection.execute(sql, params);

  return results;
}

module.exports = {
  query
}
Now we will write up the services/programmingLanguage.js file this will act as bridge between the route and the database as follows.
const db = require('./db');
const helper = require('../helper');
const config = require('../config');

async function getMultiple(page = 1){
  const offset = helper.getOffset(page, config.listPerPage);
  const rows = await db.query(
    `SELECT id, name, released_year, githut_rank, pypl_rank, tiobe_rank
    FROM programming_languages LIMIT ?,?`,
    [offset, config.listPerPage]
  );
  const data = helper.emptyOrRows(rows);
  const meta = {page};

  return {
    data,
    meta
  }
}

module.exports = {
  getMultiple
}
Then we will create routes file in routes/programmingLanguages.js, that will look like the codes given below:
const express = require('express');
const router = express.Router();
const programmingLanguages = require('../services/programmingLanguages');

/* GET programming languages. */
router.get('/', async function(req, res, next) {
  try {
    res.json(await programmingLanguages.getMultiple(req.query.page));
  } catch (err) {
    console.error(`Error while getting programming languages `, err.message);
    next(err);
  }
});

module.exports = router;
Now we are at the end of the GET programming endpoint now to make this come alive is to wire up the route in the index.js file as follows:
const express = require('express');
const bodyParser = require('body-parser');
const app = express();
const port = process.env.PORT || 3000;
const programmingLanguagesRouter = require('./routes/programmingLanguages');

app.use(bodyParser.json());
app.use(
  bodyParser.urlencoded({
    extended: true,
  })
);

app.get('/', (req, res) => {
  res.json({'message': 'ok'});
})

app.use('/programming-languages', programmingLanguagesRouter);

/* Error handler middleware */
app.use((err, req, res, next) => {
  const statusCode = err.statusCode || 500;
  console.error(err.message, err.stack);
  res.status(statusCode).json({'message': err.message});


  return;
});

app.listen(port, () => {
  console.log(`Example app listening at http://localhost:${port}`)
});
There are two main changes in our entrypoint index.js file are:
const programmingLanguagesRouter = require('./routes/programmingLanguages');
And now linking up the route /programming-languages to the router we just created as follows:
app.use('/programming-languages', programmingLanguagesRouter);
Now for your ease we have also added an error handler middleware to handle and errors to provide a provide a proper status code and message in case of an error.
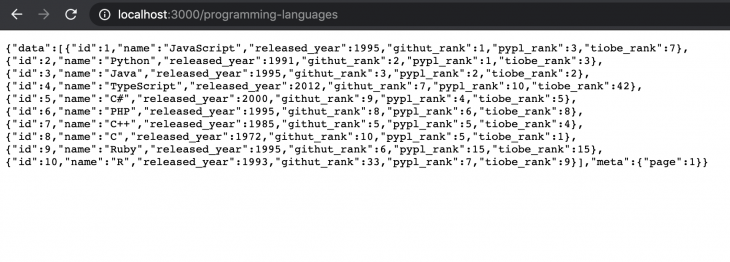
After adding the GET endpoint, when we run our app again with node index.js and hit the browser with http://localhost:3000/programming-languages, we will see an output like this:
The outputs can be different depending on the extensions you have downloaded.
Conclusion:
In this blog we have provided you with a good example of REST API for popular programming languages serves which we think is a good starting point. You also know the functioning of the API with Node js with MySQL. We also learned to set up MySQL on a free service and how to create an Express.js and how to handle various HTTP methods and in connection to how it translates to SQL queries.