If you’re an Apple user, likelihood is that you’ve seen the .heic file extension on your photos. And you would possibly wonder – what’s this photo format, and why does Apple use it? In this article, thus, we’ll discuss what HEIC is, how it’s different from the JPG format, why Apple uses it, the way to convert from HEIC to JPG, and more. So, lets start with our topic for today.
The HEIC file format
Well, first of all, .heic is that the file extension that appears on HEIF files/images. HEIF stands for top Efficiency Image Format, and it had been adopted by Apple in 2017. As you would possibly be ready to guess from its name, photos stored during this way are “more efficient”. That is, they’re smaller while still maintaining their quality.
HEIF isn’t actually a format, per se. Rather, it is a container in which the photo is stored using advanced compression techniques.
A quick note, just in case you’re wondering: HEIF is a standard, and HEIC is name given to that format by Apple.
HEIC vs JPG
There are several important differences between HEIC files and JPG files. One would possibly be more conversant in JPG. Because, it has been around longer and everybody (on any device) can use and consider them easily.
Size and quality of HEIC vs JPG photos
Another main difference is that the size of the photos, as mentioned above. HEIC photos are extra compressed. Basically, in order that they find yourself being about half the dimensions of their JPG counterparts.
Also, despite that extra compression, HEIC photos still maintain their quality (and will actually be higher quality than a JPG of an equivalent size). So you’ll actually get a far better , higher resolution HEIF photo that is the same size as a not-so-high-quality JPG. Pretty neat.
Compatibility of HEIC vs JPG
As you now already know, you cannot just casually open a HEIC file if you do not have a Mac or iPhone. That’s one among it’s major downsides, and therefore the reason Apple’s OS converts HEIC photos to JPG once you download them or attend share them.
JPG files, on the opposite hand, are compatible with all operating systems and browsers. So you’ll open a JPG anywhere. Until the remainder of the planet adopts the HEIC format, you will have to convert to JPG if you would like a simple photo opening/viewing experience.
Format details
First of all, HEIC photos have 16-bit “deep color”, whereas JPG only have 8-bit. So your HEIC photos can capture all those beautiful sunset nuances tons better than JPG.
Second, HEIC files can store multiple images or bursts or live photos (in one file), whereas JPG can only store one image per file. this provides HEIC more flexibility and allows it to store more sorts of photos (and quite one photo per file).
Convert from HEIC to JPG
If your Mac is running Sierra Nevada or later, you’ll convert HEIC images to JPG right in your photo Preview App.
Note: if you haven’t updated your OS, you will need to use a web converter.
But back to our process – here’s the way to convert those images during a few simple steps.
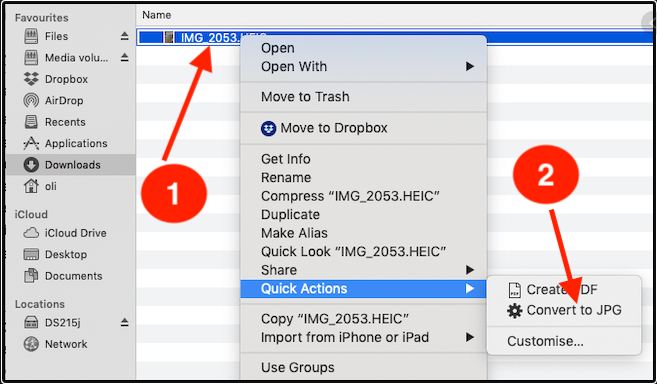
- Select the photo you would like to convert to JPG
First you would like to open Finder and obtain to your HEIC photos. Next, select the photo(s) you would like to convert, and right click thereon. Right click on the image you would like to convert
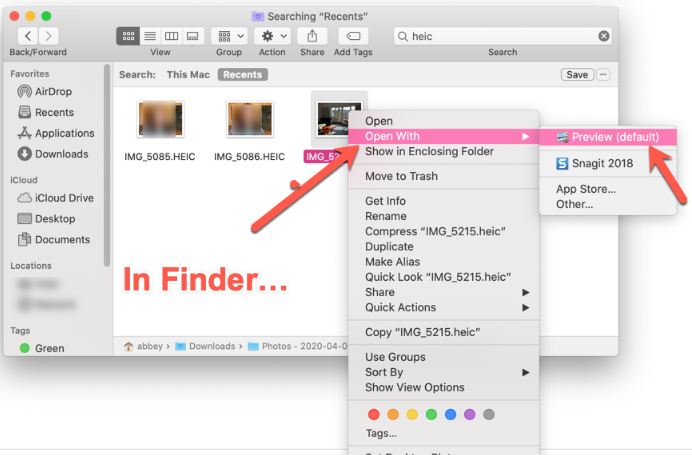
- Open the photo with the Preview App
You’ll select “Open with” (the second option for me) then the default, “Preview” as you see within the image above. Once you create those selections, it’ll take you to the photo within the Preview App.
- Select and export the photo
Next, you would like to settle on “Edit” from Preview’s menu bar, then “Select All”.
You’ll see a touch moving dashed line round the outside of the photo – this tells you your “select all” action worked. Now, return up to Preview’s menu bar and choose “File” then “Export”, like this:
You’ll need to export your image – which then gives you the choice to vary formats.
Do read this article on clipboard managers for Mac
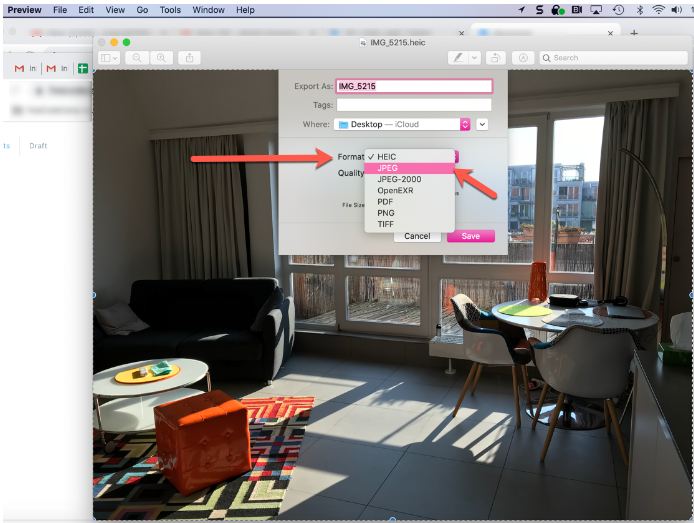
- Convert from HEIC to JPG format
Once you decide on “Export”, you will see the subsequent box pop up: Just change from HEIC to JPG and save and you’re set!
Just click on HEIC and a touch dropdown will show you all the opposite formats you may choose from.
Just select “JPG” instead and hit “Save”. Then your photo are going to be converted into JPG! And you’ll confidently share away.
Other ways
Now, what if you do not want to affect these steps and just want your phone to require JPG photos rather than HEIC?
You can do this by following these steps:
- Go to your iPhone’s settings, and scroll down until you see “Camera” – select it
- You’ll see various settings, with “Formats” at the highest – select it
- You’ll see two options, “High Efficiency” and “Most Compatible”. It’s likely set to “High Efficiency” by default (HEIC). So, just change that to “Most Compatible” and that’ll change it to JPG.
- And voilà, the photos you now take are going to be in JPG format.
SUMMING UP
In this article, we did discuss what HEIC is, how it’s different from the JPG format, why Apple uses it, the various ways to convert from HEIC to JPG, and more.
I have tried my best to make this topic clear to you. But, in case, you still have some doubts lingering. Then, please do write to me in the comments section and I am as always, ever-ready to help you. And, also solve your queries and problems.