So if you are working on the android studio and it stops. So here we are with the solution of App keeps stopping | android studio. If you want to paint something then you will give some time in preparing. The paintbrush and the canvas on which you will start painting. And for android development is our painting there is android studio which is its paint brush.

So here we are with the detailed discussion about the android studio and how to install it. And also if the App keeps stopping | android studio. So let’s take you for the ride on Android studio.
Also Read: What is IOT hidden menu? How to install it
What is Android Studio?
So developing android applications you need to write the code somewhere. And for that you need some code editor or something that will make your coding life a little easier. So writing on any code editor will surely help in finishing the job but the time and energy will increase. And you can use half of that energy and time coding in the Android Applications.
So your Android Studio is an Integrated Development Environment (IDE) for your Android development. So basically other code studios are consuming time. Where as Android studio developed for android development is easy to use and less time consuming. These are only some of the features so lets get a depth knowledge of features of Android Studio.
- You can run it instantly without any problem on your android device. To check whether the application is working or not.
- There are extensive tools that can be used to check your android applications before uploading it on a play store.
- Plus you also get the Flexible Gradle-based build system.
- Code can autocomplete.
- It also provides predefined options of template that you can use in a project.
- There is also an Emulator support that you can use to have a virtual feel of the Android device.
- It also provides you with the option of C++ and NDK support.
- Support for Github and other Version Control Systems.
How can you install Android Studio?
So for installing android studio in your Local. You need to download the latest version of the Android Studio. So if you think your system is not up to the mark for android studio you can check the system requirements here.
Also you can download the Android Studio from here
So to install the Android Studio you can follow these simple steps and your android studio will be installed and ready to use within minutes:
- If you downloaded an
.exefile (recommended), double-click to launch it.If you downloaded a.zipfile, unpack the ZIP, copy the android-studio folder into your Program Files folder, and then open the android-studio > bin folder and launchstudio64.exe(for 64-bit machines) orstudio.exe(for 32-bit machines). - Follow the setup wizard in Android Studio and install any SDK packages that it recommends.
How to write your first Android Studio application:
So as you install the Android Studio it will provide you with different options of template to start your work from the scratch.
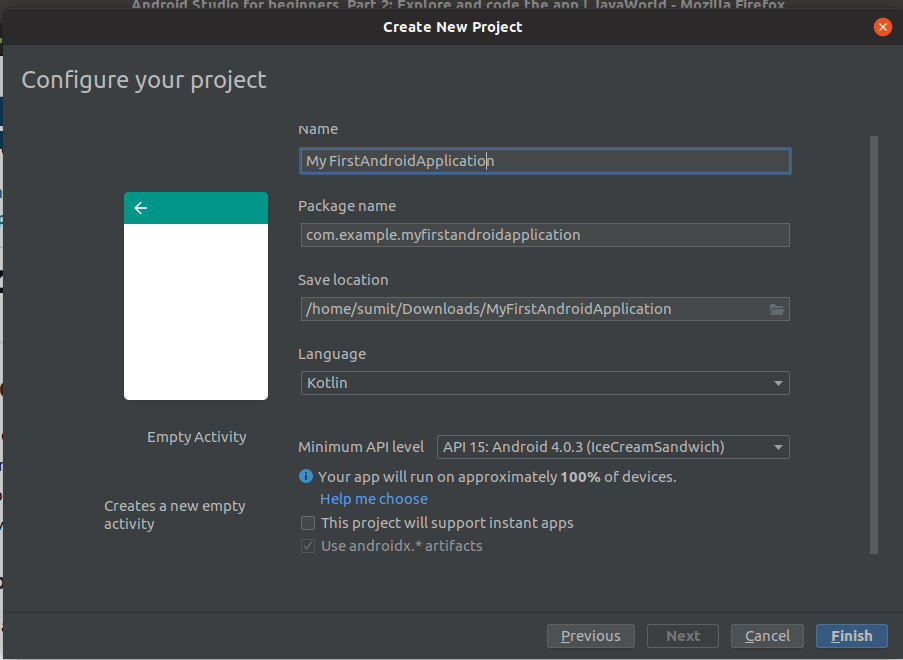
To create a new project you have to start the android studio and then click on the Start a new Android Studio project:

When you select the option of Start a new Android Studio project. Android studio will give you options of several different templates. You can choose from without coding for them. So you can use any of it and if you don’t want you can use basic or empty canvas for your work.

After that you will get the option of filling some of the information like name of the application, package name of the application, save location, language. Then you have to select the minimum API level. Then you filled the information click on finish.
Now everything is done. Your Android Studio is ready to use. After that you can use your device by connecting it with a USB. Then you can run your first basic programs that you have just learnt. But, before that, get familiar with the Android Studio. Below screen will be opened whenever you create a project in Android Studio:
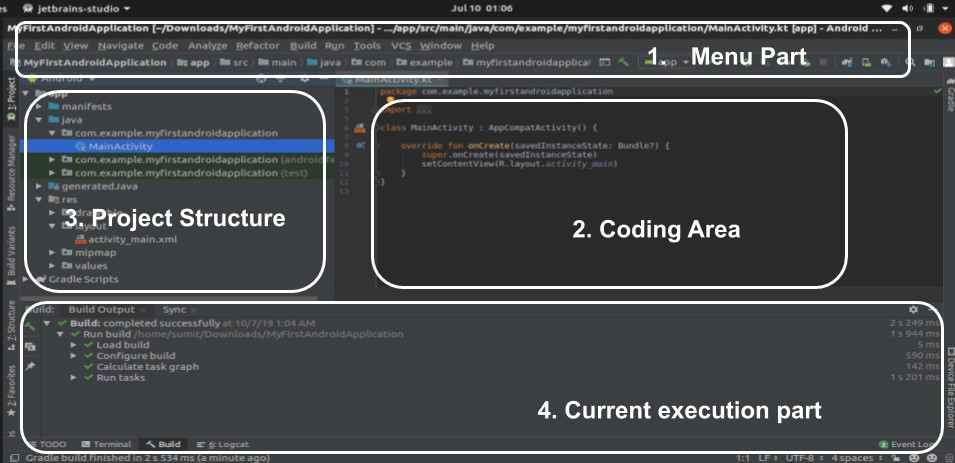
Understanding the sections in the image above in little bit of detail to understand the things:
Menu part:
Here you get options of starting a new project, opening a project that is saved in your local or any other device of your choice. You have many different options available in the menu.
Coding area:
This is an area where you write the code for your .kt or .java or .xml file. So there are options of opening different codes at once. But you can only edit one at a time.
Project structure:
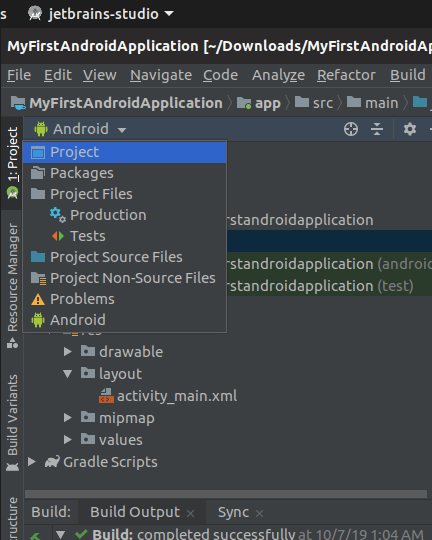
So this is part of the screen where you can select the projects and also access all your files present in your project. There are various views of the project structure in Android Studio. You can use the below views:
Current execution part:
This part is the most important part of the Android Studio. Here, you can see the currently executing process or activity. You can detect the error if any in your Android application. Here, you will get all your build outputs and actions, logcat results, todos and also, you can use terminal here in your Android Studio.
How to Run your app?
So in the android studio you can use your local or you can use phone to run the program but also if you don’t want that you can use emulator. This is also same as the other devices. It will just consume your RAM and the rest will be easy.
So to run the app just follow the simple steps:
- First you have to use the USB cable to connect to the device
- Then after that open the setting on your phone.
- (Only on Android 8.0 or higher) Select System.
- Scroll to the bottom and select About phone.
- Scroll to the bottom and tap Build number 7 times.
- Return to the previous screen to find Developer options near the bottom.
- Open Developer options, and then scroll down to find and enable USB debugging.
- After that, in your Android Studio, click on Run to run your application by selecting the connected device
App keeps stopping | android studio
So after all this one day you’re writing a code and your android studio stops. Don’t you worry we have a solution for this too. You might be facing some issues again and again and there can be few reasons for them. So we will try to resolve them here only.
Are you facing difficulty that your ANDROID STUDIO faces an unexpected exit while you are working on something. Or there are things that your app cannot handle because of exceptions in the programs. And if you are writing the code in the java the exception handling thrown is the SIGSEGV.
So when this kinds of exception handling occurs there are problem that occurs and when these problems occur the App crashes. So we will look into the problem of App keeps stopping | android studio. Here are some reasons why your App keeps stopping | android studio. And we are providing you with solutions to fix them.
Clear Cache in your phone
One of the reason you app might crash is that your cache memory is full. So people generally neglect the cache memory and keep using their phone. And as the time passes it gets full. And when you to install a new and run it it needs some cache memory and when its full it might get crashed. So now will discuss some of the steps that you can follow to clear out your phone cache memory.
- First you have open your phone setting.
- Then go to the phone storage and then open it.
- Then after going at the bottom click on the cache.
- Now when you tap on it there will be popup message will appear. Now just select the option of clean the cache and it’s done. All it takes is three simple steps.
Installing the App incorrectly
This happens sometimes that you are installing an app and it doesn’t install correctly. In that case your app keeps crashing. So in this case you need to uninstall the app and then install it again.
In this case i don’t think i need to say much of how to install and uninstall the app on your device. But then let us give you a hint. Click on any app on your device then there comes an option of uninstalling the app. And then go to the app store of your phone and install the app.
When you write the code incorrectly:
This is one of biggest issue that your Android studio will crash. So what happens generally when you write a code and your code has issues. So when the run time error occurs the app will close and thus generating a problem. But this issue does not need any hard work to resolve you just need to correct the errors in your code and it will work fine.
Having Problems with Emulator:
If you are working on a android emulator and its stops working. There is probably a chance of you have not installed the emulator properly. So we are giving you two methods by which you can use and fix the emulator easily.
- Reading Stack trace:

If uninstalling the app and installing it again does not work you should do this. You have to track the root of the problem and for that you have to take the help of Stack trace. It will help you get to the root of the problem and will help you fix it. It is quite an easy and handy method to quickly fix the crashing of the android studio. It gives out two kinds of problems you are facing the kind of exception you are facing and if the exception has happened in the entire code.
- Memory Errors that you face:
So if you are using the emulator on a local that is stacked in memory. It can lead to the crashing of the app. Because your emulator uses the memory of your local and if it’s not there it can lead to the android studio app keeps stopping. So you can fix it with simple solution. You can allot the memory the emulator will use and it will done and fixed. Now after talking about the stopping issues we will talk about how you can change the name of your project.
Renaming an Android Project:
Now after talking about the stopping issues we will talk about how you can change the name of your project. Because android studio doesn’t provide you with the option of directly changing the or renaming the project so you we are here don’t you fear we will provide you with several different methods of changing the name of the project.
First Method:
- First step you have to do is open your project.
- Then after that open your manifest.xml file.
- Then after that write this code and then change the name. In the place of app name write the name of your choice you want and it’s done. The code is provided below:
android:label="@string/app_name"Second Method:
- The First step is always opening your project.
- Then select the project name and click on the setting button.
- After that click on the empty middle packages.
- Then right click on the androidride folder. Then open the setting menu
- After that click on the refactor and then rename.
- Then a warning message will popup and then click on the rename.
- Then right click on the myapplication folder.
- Then again click on the refactor and rename and again a warning message will appear ignore the message. And click on rename
- Input the name of your file.
- click on the refactor and then click on the do refractor.
- After that click on the application id and then click on the build.gradle.
- After that a page opens and then you have to find the change the application id and then change it com.xyz.text. xyz is the name you want to provide.
- Then click on the sync button and your project name is changed. I don’t need any thankyou its my work.
Third and last method:
- First you have click on the project name in the application id which we told you to name com.xyz.text.
- Then click on the refactor and select move.
- Then click on the move package com.xyz.text. then move it to another package.
- Then click on the OK. After clicking on the OK there will list of warning will appear ignore the warnings. Then click on the OK.
Keyboard Shortcuts:
These are some of the keyboards shortcut that you can use. While writing your program in the Android studio. And perform number of operations in a faster way.
| Operations | Keys |
| Replace | ctrl + R in Windows/Linux and cmd + R in Mac |
| Find class | ctrl + N in Windows/Linux and cmd + O in Mac |
| Find file | ctrl + shift+ N in Windows/Linux and cmd + shift+ N in Mac |
| Find | ctrl + F in Windows/Linux and cmd + F in Mac |
| Zoom in/out | ctrl + plus/minus in Windows/Linux and cmd + plus/minus in Mac |
| Fit to screen | ctrl + 0 in Windows/Linux and cmd + 0 in Mac |
| Go to xml | ctrl + B in Windows/Linux and cmd + B in Mac |
| Toggle device | D in Windows/Linux and D in Mac |
| Override methods | ctrl + O in Windows/Linux and cmd + O in Mac |
| Implement methods | ctrl + I in Windows/Linux and cmd + I in Mac |
| Generate code | alt + ins in Windows/Linux and cmd + N in Mac |
| Start new line | shift + enter in Windows/Linux and shift + enter in Mac |
Conclusion:
So we have talked a lot and sorry for that we should have stopped but giving you all the information was also necessary. We have talked about how to install the android studio and how to use it and what to do if application keeps stopping android studio. So we also talked about App keeps stopping | android studio. And what are some of the keywords that you can use while working. So hope you find this blog useful. Thankyou for the read.